All posts by admin

How to Resolve QuickBooks Error 6123?

QuickBooks company file plays a crucial role as it contains all the essential company records. Thinking a day without getting access to the data file is not less than a nightmare. But at times, users might witness QuickBooks Error 6123 while opening, upgrading or restoring the data file users might encounter QuickBooks Error 6123.

Every time the error comes up, it started flashing the following error message on your computer screen indicating:

QuickBooks error 6123 (Message)

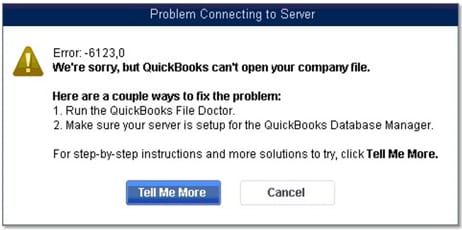
As a result, it might hamper your ongoing business operations and put the entire work to a halt. Therefore, it is essential to troubleshoot the error as soon as possible by following the correct resolution methods. This post covers all the root causes that evoke the error and the solutions to get the issue fixed.

“Struggling while accessing your company file due to QuickBooks Error 6123? Get direct assistance from our QB experts by dialing @ (844) 508-2335.”

Reasons Why I Come Across QuickBooks Error Code 6123

Understanding the actual cause behind the QuickBooks Error 6123 will help you to deal with the issue instantly. Here, we have described some of the factors that might lead to the error. Check them out.

  • Damage in the QuickBooks company file might result in QuickBooks Error 6123.
  •  It might occur when you are using the QuickBooks version that isn’t available anymore.
  • Sometimes, it might evoke due to the multiple versions of the QuickBooks database service.
  • There might be the possibility that you have renamed the system carrying your company file.
  • In certain instances, it might take place due to the damaged Windows operating system.

Effective Resolution Methods to Fix QuickBooks Desktop Error 6123 

Before performing the fixation methods discussed below, ensure that you have turned off your antivirus and security programs. Additionally, there might be three conditions that might contribute to the QuickBooks Error Code 6123. 

Instance 1: When you get QuickBooks Error 6123 while opening or restoring the company file

You must ensure that you access your company file from QuickBooks instead of Windows Explorer. However, if you try to access your company file using Windows Explorer you might end up with QuickBooks Error 6123. Therefore, to resolve the issue, adhere to the following steps listed below.  

Solution 1: Repair the Damaged program using Quick Fix My Program 

Before accessing the Quick Fix My Program you have to download QuickBooks Tool Hub on your system. For that, all you have to do is to apply the steps listed below thoroughly.

  • First of all, you have to get the most recently launched version of QuickBooks Tool Hub i.e, (1.5.0). 
  • After downloading the Tool Hub, you have to store the file to the location from where it is easily accessible. 
  • Now, navigate to the downloaded folder and search for the setup file i.e, QuickBooksToolHub.exe. Then, double-click on the file to open it on your device.
  • Implement the steps as displayed on your computer screen to install the QuickBooks software. Then, give consent to the terms and conditions specified in the incense Agreement.
  • Once you have successfully installed the QuickBooks Tool Hub, double-click on its respective icon to open it.
  • After this, choose the Program Problems tab from the QuickBooks Tool Hub.
  • Following this, hit on the Quick Fix my Program tab and allow the tool to run. For instance, if you have installed QuickBooks on multiple versions then it may take a bit longer to run the tool. 
  • Once the tool repairs the program, open QuickBooks Desktop and verify if the issue is resolved.

Solution 2: Use the QuickBooks File Doctor Tool to repair file damage

The QuickBooks File Doctor Tool plays a crucial role as it enables the users to repair the damage in the file. Before using this tool, you must have to get QuickBooks Tool hub on your system by following the steps listed below:

  • Open the QuickBooks Tool Hub on your device and then opt for the Company File Issues tab.
  • After this, choose the Run QuickBooks File Doctor tool and then move to the next step.
  • Once the File Doctor opens up, click on the drop-down menu to pick the company file. If you can’t see your data file, tap on Browse option to look for your company file. You will see your file naming “[your company name].qbw”. 
  • Subsequently, tap on the Check your file and then hit the Continue option. With this, the QuickBooks will begin repairing your data file. 
  • Once you have successfully repaired the file, choose your company from the list of options available. Further, click on the Open QuickBooks options.
  • Then, if you are able to access your company file without encountering any issues, it reflects that everything is fixed. You have to ensure to generate the backup of the company file once you are able to access it.

Instance 2: When you receive the QuickBooks Error Code 6123 while restoring your company file (.qbw)

Solution: Restore the QB Company File from Local Drive

The users are required to transfer the backup file to the local hard drive. Also, you mustn’t open the company file from an online storage folder. Here are the stepwise instructions to recover the company file from the backup.

  • Begin the process by opening the QuickBooks application on your device if it is not already open.
  • Navigate to the File menu and then opt for the Open or Restore Company option.
  • Following this, choose the Restore a backup copy > Next > Local Backup > Next. 
  • Then, you have to look into your computer for the backup company file. You will get the backup company as: “[Your Company name].qbb”.
  • Next, you have to pick the folder to make a decision where to restore your company file. For that, you have to choose the Open option.

Finally, hit the Save option. For instance, if you receive any data regarding overwriting data. In that case, choose the option that suits best as per your requirement. 
 
Instance 3: When you confront QuickBooks Desktop Error 6123 while restoring a backup (.qbb) on a new system

Solution: Generate a portable company file (.qbm) for restoring the data file 

  1. Initially, you have to launch the QBDT on the same computer in which you have generated the backup of the file.
  2. After this, you are supposed to open your original company file.
  3. Now, you have to generate a portable company file by performing the steps listed below:
    • Firstly, access the QuickBooks application and then sign in using the Admin credentials.
    • Then, move to the File menu and then hit the Create Copy option. 
    • Following this, choose the Portable Company file and then Next.
    • Assign a different name to your portable company file so that you can distinct it from the older one.
    • Next, you are supposed to get your portable company file saved on the Windows Desktop where it is easy to find.
    • Click on the Save button and then hit the Ok button to proceed further.
  4. After performing the steps above, launch the QuickBooks Desktop on your device.
  5. In the end, restore your data file using the portable copy in place of the backup company file. 

Ending Words!!

This post covers all the facts related to QuickBooks Error 6123. We assure that now you can easily gain access to your QuickBooks company file and use the company file records. However, if you get stuck at any of the above-listed steps, we suggest you connect with our experts. The simplest ways to connect with our QuickBooks professionals is through email or live chat.

How to Change TurboTax Password (Simple and Easy Way 2022)

Nowadays, the need to strengthen and secure passwords is increasing with the advancement of technology. Considering TurboTax is a tax-preparation software, generating a unique and hard-to-crack password is mandatory. By creating a strong password, users can keep their data safe and secure from cyber threats and unauthorized access.

But, there might be certain instances when the users forgot their TurboTax password. As a result, they won’t be able to utilize this TurboTax taxation software to file taxes. In that scenario, it is necessary to change the TurboTax password so that they can resolve the issue and proceed with their ongoing work. This guide will give you complete information about how to reset TurboTax password.

Stepwise Instructions to Change TurboTax Password

Are you fed up of searching for the simple instructions to Reset TurboTax password? Well, don’t panic, as your search ends here. Below we have mentioned some of the simple steps using which you can easily recover your password.

Case 1: If you have forgotten or lost your TurboTax Password

For instance, if you need to change your old password but forgot or don’t remember it. In that scenario, the user can retrieve the password by following the steps listed below.

  1. Begin the process by visiting the Account Recovery Page of TurboTax.
  2. Afterwards, you are required to add any one of these following details:
    A. Phone Number (recommended)
    B. User ID
    C. Email Address
  3. Soon after this, do as per the instructions directed on the screen to reset your lost password. The TurboTax will customize them according to the information the users provide and whether they determine your device or not.
  4. Once the process is over, TurboTax will provide you with a code to recover your TurboTax password. Otherwise, it will provide you with a list of accounts linked with your information.

Even after performing the steps listed above you are unable to recover your TurboTax password, tap on “Verify my account a different way” from the Account Recovery Page. You will be asked some additional questions to authenticate your identity.

Case 2: If you want to Change TurboTax Password

For instance, if you remember your old password and want to change it for security purposes, follow the steps below.

  1. Start the process by signing into your TurboTax account using the correct login credentials.
  2. Following this, opt for the Intuit Account located at the lower-left corner of your screen.
  3. Now, click on the highlighted Sign In & Security option from the Manage your Account section.
  4. After this, choose your User ID or Password to make the relevant changes.
  5. Now, generate a new password for your account and then enter into the respective text field.
  6. Once all the information is entered into the required text fields, cross-check them.
  7. In the end, hit the Save button to save the desired changes to your TurboTax account.

Stepwise Instructions to Change TurboTax Password in your Mobile App

If you forgot or lost your TurboTax password and are unable to log in to your account in your mobile application, then change TurboTax password. Therefore, to change the TurboTax password on the mobile application, follow the steps listed below:

  1. Initially, you have to open the TurboTax mobile application on your device.
  2.  Then, add the email address, user ID, and password into their respective text fields. Then, hit the Sign In tab.
  3. For instance, if you have mentioned your phone number or email address, you have to add the verification code you received. Further, you must choose the ID you want to log into your TurboTax account.
  4. Now, click on the “Sign in a different way” option and then proceed further.
  5. After this, you will be provided with options depending upon the information provided by TurboTax. If you can get the verification code via email address and password associated with your account, you can easily login without a password.
  6. On the other hand, if you cannot use the email address or phone number linked with your account, click on the “Verify a different way” option. This will redirect you to the Accounts Recovery Request tool, where you can reset your TurboTax password.

How to get a verification code if the email address is incorrect?

If the user is unable to receive a verification code on their email address, then you won’t be able to receive your verification code. But the next alternative is that you can get the verification code on your mobile number.

Acquire the verification code via mobile number 

  1. Initially, you have to choose whether you want to get the verification code on the text message. Then, click on the Continue option.
  2. You mustn’t shut down the window until you receive your verification code. It might take some time to send the verification code.
  3. If you have opted for the text message, then add the verification code in the field represented by Enter 6-digit code. Ensure that you mustn’t add the confirmation code within the password field.
  4. Whereas, if you have opted for the email option, then the email confirmation doesn’t require the code. For that, click on the Verify button in the email, and it will eventually take you to the TurboTax page.
  5. Further, opt for the Continue option to log in to your account and continue further by completing your return.

If the texting feature isn’t available then you have to confirm your account using a different way.

Stepwise instructions to confirm your account in different way

  1. In the first step, if you are prompted click on Confirm my account in a different way and then the Continue option.
  2. Go through the on-screen prompts to add information from the previous year’s tax return. Here, you must ensure that you have added the taxpayer’s information.
  3. Proceed further by clicking on the Continue option.
  4. Whenever asked, you need to give answers to the TurboTax-generated security questions. These questions will completely depend on the information that only you should be aware of. If none of the answers applies from the list available, tap on “None of the above”.
  5. Once you have given all the answers, it will redirect you to the Welcome Back! Screen. You must add the email address and mobile number on this screen.
  6. In the end, once your identity is verified, it will take you to the TurboTax account. The total time taken to accomplish this entire process would be five minutes.

Final Thoughts!

We hope that now you have got all answers to your query regarding how to change TurboTax password. However, if the issue still continues you can have a one-to-one conversation with our TurboTax experts to clear all your doubts. You can connect with our experts via email or a live chat support facility.

How to fix Quicken Error CC-501

Generally, the users might have stumbled upon Quicken Error CC-501 while trying to update their bank account with the Quicken online services. In other instances, it may occur while downloading new transactions into Quicken software from your bank. 

On the occurrence of the error, the following alert message will be displayed on your screen indicating:

Quicken Error message cc-501

As a result, this error might obstruct the users from downloading the latest bank transactions in Quicken. Thus, it hampers bank-related tasks and stops ongoing work. Therefore, it is essential to resolve the issue asap using the resolution methods discussed in this post. 

“Stumbled upon Quicken CC-510 Error and don’t have know how to fix it ? Feel free to ring us at @ +1-844-508-2335 and obtain the best possible assistance from our professionals.”

Causes that Contribute to Quicken Error CC-501 

The users might come across Quicken CC 501 while trying to update their bank account in Quicken. Apart from this, multiple other factors might bring forth this error, and let’s explore them.

  • Sometimes, it may occur due to issues on your bank’s end. 
  • The version of Quicken you are presently using isn’t in use any more.
  • One of the reasons behind Quicken Error CC-501 is a corrupt or impartial download of the Quicken software. 
  • You may have added the incorrect bank login details while connecting to the bank account in Quicken.
  • The malware or viruses in your system might cause damage to your company file.

Key Points to Remember Before Resolving Quicken Error Message CC-501

There are certain points that you must keep in your mind before resolving Quicken Error CC 501. Therefore, we have specified some of the points below to inform you regarding them. Read the points carefully. 

1. Generate a Backup of the Quicken Data:-

Before proceeding Further, it is essential to establish the Backup of your Quicken file. Doing so will help keep your company data safe even if your original file gets damaged. And thus, you can restore this file to your preferred location. Apply the steps listed below to generate the Backup of the Quicken data properly.

  • In the beginning, open the Quicken application and then move to the Backup menu.
  • You are then required to select the Restore option and Backup Quicken file.
  • Finally, tap on the Backup Now option, and it will automatically generate the Backup of your Quicken file.

2. Don’t add the transactions into the register directly:-

Doing so will prevent you from generating duplicate copies of transactions within the accounts register. Perform the steps listed below to ensure that the transactions are not getting entered into the register directly. 

  • In the initial stage, open the Quicken software and select the Edit menu.
  • Following this, opt for the Preferences option. 
  • Furthermore, click on the drop-down menu to pick the Downloaded Transactions option. 
  • Now, you must verify that you have unmarked the Automatically add to the bank register checkbox.
  • Finally, tap on Ok to save the mandatory changes made in Quicken software.

Simple Tips to Overcome Quicken Error CC-501 Permanently 

Do you need help to get the proper solutions to resolve Quicken Error CC 510 instantly? If that’s the scenario, then don’t panic. Go through the below-listed solutions and apply them as per the cause of the error. Ensure that you apply the steps in the way listed below to avoid further discrepancies. 

Case 1: While Downloading New Transactions

For instance, if you are receiving Quicken Error CC-501 while updating the bank transaction or getting the new bank transactions with Citibank, the first financial bank. In that case, the users might come across Quicken Error CC-501 for multiple reasons. Therefore, we have listed some simple resolution methods below to eliminate the error. 

Solution 1: Update the account in which you are getting Quicken Error CC-501 

  • In the initial phase, open Quicken and then move to All Accounts that have encountered the error.
  • Then, you have to refresh your Bank Account Settings and pick the Account Name that has caused the error. 
  • Furthermore, tap on the Gear icon, which is represented as an icon with a downward arrow. 
  • After this, click on Update or press the Ctrl + Alt + U keys to refresh the accounts settings successfully. 
  • You are supposed to add the Quicken credentials when prompted. 
  • As a result, it will open a new window with a function of one-step update settings. From there, you have to choose the Update Now option. 
  • Now, it will ask you to modify your Quicken credentials. Once completed, hit the OK button.
  • Subsequently, go through the instructions on the screen, and your account will update. 
  • Finally, you have to apply the same procedure on all the accounts incurring this issue.

Also Read – Fix Quicken Download Error 102

Solution 2: Disconnect and Reconnect the Account Causing the Error 

Users might sometimes overcome Quicken Error CC-501 by deactivating and reactivating the bank account. For that, you have to apply the steps as listed below attentively.

Disconnect the Account
  • Initially, open the Quicken application and move to the Tools menu. From there, head towards the Accounts Lists option and then move ahead.
  • Following this, Edit the account that is creating the issue from the list of available accounts.
  • Move to the Online Services tab and then opt for the Deactivate option.
  • Now, in the Conformation window, tap on the Yes option to give consent to your action.
  • After deactivating the account, select the Set Up Now option.
  • Ultimately, click on the OK option and then hit Done.
Reconnect the Account 
  • In the first stage, move to the Tools option, followed by the Add Account option.
  • Then, you must pick the type of account, such as checking, Savings, etc. 
  • After this, choose Advanced Setup and then add the name of your bank account in the required text field. Move ahead by clicking on the Next button.
  • You are supposed to pick the appropriate connection method and then hit the Next button.
  • After this, add the bank login details and hit the option Connect.
  • Eventually, Quicken will begin looking for your bank account and represent all the accounts’ list. Further, you must tap on the Reactivate option beside the account you want to reconnect. 
  • In the end, tap on the Finish option to reconnect your bank account successfully.

Solution 3: Review Your Account Status 

  • The first and foremost step is to move to the Tools option and then Online Center.
  • After this, you will find the list of all the offending transactions mentioned below in the Transactions Lists.
  • Now, you must look for the listed transaction and remove it.
  • Next, update your account and then reconcile it once again. 
  • If you are not receiving the same error any more, it reflects that all the errors in your account have been removed successfully.

Solution 4: Install the Quicken software again

By uninstalling and reinstalling the Quicken software will help in resolving the Quicken error CC-501. 

  • Initially, press the Windows + R keys at the same time and insert “appwiz.cpl” in the search column. 
  • As a result, it will open the Quicken entry, right-click on it and then opt for the Uninstall option. You must be sure that you have successfully removed all the temporary files. 
  • Following this, you must download and install the Quicken software on your device. 
  • In the end, add the account details and then look for the error status. 

Also Read – Fix Quicken install error 1603

Case 2: While Setting Up or Updating Mobile Sync With Direct-Connect Activated 

Condition 1: Quicken Error 501 Due to Connection Time Out

Sometimes, your connection might take time out while trying to accomplish the setup of Mobile Sync. As a result, you won’t be able to wind up the connection. In that scenario, you are supposed to perform the steps listed below.

  • You may try contacting your bank account at different times of the day, avoiding peak traffic hours.
  • Also, you must ensure that you are not trying to connect or update other applications. Doing so might hamper your internet speed and thus leads to Quicken Error CC 501. 
  • Ensure that the firewall settings and your ISP don’t interrupt the “QW.exe” file from accessing the internet connection.
  • For instance, if you still receive the error on your first sync, try to add a single account at a time. 
    • Using Quicken Mobile Sync, you can only transfer the previous 365 days of data for any banking or credit card accounts. 
    • By “entering” the smallest amount, you can reduce the amount of data transferred on initial sync. Thus, it also creates the database and eliminates the chances of Time Out occurring again while connecting to the bank account in Quicken. Also, you may add the additional accounts after the initial sync by tapping on the Edit Accounts. 

Condition 2: Enrollment is Required By Your Financial Institution

There are a few banks that require enrollment so that they can easily determine which applications are compatible to connect with their servers.

  • Firstly, reach your bank website and verify whether it has a self-serve section. Using this section, you can access your accounts on their servers.
  • However, if you won’t get the self-serve solution and need help registering, you can reach out to Online Banking Support. 
  • On the other hand, if you don’t have any contact details regarding your bank, try the steps listed below.
    • Select the Tools option and tap on the Online Center to pick the bank name.
    • After this, you must hover your cursor over the Contact Info Link.

Conclusion!!

Here, we conclude this post and hope you can now easily connect your bank account with Quicken without getting Quicken Error CC-501. If you still find the same issue, you can consult with our Quicken Support number anytime via live chat. After this, our experts will do deep research and assist you in the best possible manner.

How to Change Phone Number on TurboTax accounts

TurboTax is a flawless tax-preparation software that provides easy tax calculation and smooth tax-filing features. However, to access the TurboTax on your system, it is essential to create an account. For that, you must add all the personal details like email address, phone number, password, and social security number.

At times, users feel the need to change phone number on TurboTax accounts due to several reasons. It might be possible that you have purchased a new number, and your old number is not in use anymore. In that case, updating the new one is mandatory so that you can receive useful notifications on that number.

This comprehensive post contains all the essential information required to change the phone number on TurboTax.

“Unable to change phone number on TurboTax and require instant help? Place a call at @+1-844-508-2335 and get all answers to your queries within no time.”

Steps to be Performed to Change Phone Number on TurboTax

Are you looking for detailed steps to change the contact number of TurboTax accounts? If yes, then have a glimpse of the instructions listed below thoroughly.

  • The first and foremost step is to log in to your TurboTax Online account using the correct login credentials.
  •  Now, you have to tap on the Intuit Account present at the lower left corner of the screen.
  • Soon after this, hover your cursor over the Edit option at the right of the phone line. Then, further move to the “Change next to your phone number” option.
  • Next, you are supposed to add the new phone number in the required text field. You must be very attentive while entering the wrong password. This is so because an incorrect phone number won’t allow you to get access to your TurboTax account. Thus, it might interrupt you from gaining access to your TurboTax account.
  •  Afterwards, you have to add the new password correctly.
  • Once you have added all the details, you must cross-check all the details for further discrepancies. You can only make the required changes if you find any issues.
  • On a final note, tap on the Save button to save the mandatory changes made to your TurboTax account.

With this, now your TurboTax account phone number has been changed successfully. Thus, you can now easily get a code on your number to recover your TurboTax account easily.

Steps to be performed when you can’t verify your number on TurboTax

In certain instances, the users might face difficulty sending or receiving SMS verification codes on the registered mobile number in TurboTax. For that, you have to apply the following instructions listed below.

Step 1: Verify Your Phone Number:-

While entering the phone number in your TurboTax accounts, you must check that you have entered the contact number correctly. Also, you have to check that you have selected the right country code.

Step 2: Look For a Good Wi-Fi Or Mobile Data Connection:-

  • To cross-check the internet settings, you must go to the Settings option.
  • After this, you must verify whether the Wi-Fi or Mobile data is switched on. Apart from this, you must ensure that the Airplane mode must be off.
  • Change your location if you are still waiting to receive the proper internet connection. Ensure you have shifted to the location where you are getting the high-speed internet connection network.
  • To test your internet network connection, you must try opening Google Chrome on your device. You must access a website and see whether it is loading or not.

Step 3: Verify whether you are receiving the SMS texts

Move to the Settings menu to check that you are getting the SMS on your registered mobile number. Then, proceed further by implementing the steps listed below.

  • Make sure that your mobile phone is receiving the proper network.
  • Also, you must verify that you have not enabled the Airplane mode.

Step 4: Request For a New Verification Code

After performing the above steps, you can look for the verification code and then ask for the code again.

  • For instance, opt for the Resend SMS option if you don’t receive a text message.
  • On the other hand, if you have only a mobile connection and cannot receive the SMS. In that case, you can request a call by clicking on the Call Me option.

Step 5: Try to Fix the Application

The users can fix the application through multiple devices like Android, Mac, and Windows devices. Follow the instructions described below thoroughly.

For Android Users

  • Firstly, access the Settings of your Andriod’s device.
  • After this, select Apps >> Duo>> Force Stop and then open Duo again.
  • Now, uninstall the Duo application and then download it once again.
  • Next, relaunch your device and then access the Duo application on your device.

Windows PC Users

  • Firstly, choose the Time option present at the bottom right corner of the screen.
  • Afterwards, go to Settings and pick the Google Play Store option.
  • Following this, click on Manage Android Preferences > Apps.
  • Now, you must pick the Duo option from the list of applications available.
  • Then, hover your cursor over the Force Stop option and access the Duo application again.
  • Try to uninstall and then install the Duo application on your Windows device.
  • In the end, switch off your device and then turn it on. Later on, open the Duo application.

For iPhone and iPad Users

  • Initially, you should double-tap on the Home button from your iPhone or iPad.
  • Then, swipe up on Duo and open the application on your device.
  • Furthermore, uninstall and install the Duo application on your system.
  • Later on, disable your device and then again turn it on. After this, you must open the Duo application on your Mac devices.

Drawing To a Conclusion!!

We assure you that the details mentioned above will provide you a better insight into how to change phone numbers on TurboTax accounts. You can reach out to our experts via live chat if you have any doubts or trouble changing the contact number. Once the query reaches our TurboTax experts, they will make all their efforts to provide you with all the necessary assistance.

How To Fix QuickBooks Unrecoverable Error?

QuickBooks unrecoverable error is a common issue in the program reported by users now and then. Despite being one of the best accounting applications, some issues can make it hard for you to resume an ongoing task. Unrecoverable error in QuickBooks can crop up abruptly when you are busy managing your business accounting with the tool.

QuickBooks unrecoverable error

This error can sound intimidating; however, you can resolve it by following a few simple solutions we are going to discuss in this article. Knowing the possible reasons behind the error can facilitate the error resolution process. Let’s take a tour!

Can’t run your accounting program due to QuickBooks unrecoverable error? Give us a call @ +1-844-508-2335 to get sure and certain error resolution.

What Does QuickBooks Desktop Unrecoverable Error Mean?

When the error occurs, you will notice a warning message on your screen – QuickBooks has encountered a problem and needs to close. The error typically occurs when opening a QuickBooks company file. In addition to the error message, you may also receive the related 10-digit error codes, such as 20888 41171 and 00551 46274.

The unrecoverable error depicts that there is a problem with the programs required for the smooth functioning of the QuickBooks application. You can get this error message in various instances, such as when opening the QuickBooks company file, when clicking the print or ship icon and when clicking the Save button.

What Are The Signs & Symptoms of QuickBooks Unrecoverable Error?

If you are still not sure if it is the unrecoverable error, which is hampering your workflow, then the below-given signs of the error can certainly give you some clarity:

  • QuickBooks software freezes, and you won’t be able to work with the program.
  • You may not be able to accomplish an update process due to the error.
  • When you try to open the program, it crashes in no time.
  • You may also experience the frequent crashing of the program.
  • Trouble finding the saved transactions in the QuickBooks company file.
  • You will see the updates getting installed, but it won’t actually end.

Now that the symptoms are not unknown, you know when to implement the troubleshooting solutions. However, what to fix is still unknown. We will discuss it in the next section of this post.

See Recent post – How To Fix QuickBooks Error H202

What Promotes The Unrecoverable Error Message in QuickBooks?

There is not one but many possible reasons that can bring forth unrecoverable error in QuickBooks. Check the below-given list:

  • When your computer is not functioning well, its impact can also be felt in QuickBooks.
  • QuickBooks has essential components missing or damaged.
  • Improperly installed QuickBooks updates can also be a possible reason behind the error.
  • Abrupt network issues when logging into the QuickBooks application.
  • Missing or damaged Windows updates.
  • A power outage can also promote QuickBooks unrecoverable error.
  • Data integrity issues in the QuickBooks company file.
  • Corruption in the data needs immediate attention for repair.

What Are The Various Instances When Unrecoverable Error Can Take Place?

QuickBooks unrecoverable error can take place in various conditions as stated in the below-given list:

  • When using direct deposit in order to send Payroll.
  • When a user tries to access the feature named Open Previous Company.
  • Creating a backup of the QB data file.
  • While running, verify or rebuild utility to find and fix data integrity issues.
  • During the Upgrade or update process of the payroll software.
  • While you try to import the Accountant’s changes in QuickBooks.
  • Closing any of the opened windows from within the QuickBooks data file.
  • When conducting or viewing the last reconciliation reports.
  • At the time of opening the QuickBooks desktop file on your workstation.
  • While you try to import the Accountant’s changes in QuickBooks.
  • Data damage can also evoke errors known to be unrecoverable in QuickBooks.
  • When you click any of the following options – email, print, save, in QuickBooks.
  • When you attempt to save a record of a transaction in the program.
  • If you are writing checks utilizing the QuickBooks Online Bill Pay.
  • When running the Rebuild utility to repair damaged data.

How To Resolve QuickBooks Unrecoverable Error?

Now that you have a bounty of knowledge on an unrecoverable error in QuickBooks, we can proceed further and start with the troubleshooting solutions. It is recommended that you keep a backup of your QuickBooks company file, as it will save your data from loss or damage. Now let’s start the troubleshooting:

Solution – 1: Fix the QuickBooks Desktop In The First Place

Before you start troubleshooting the error, you need to ensure that the QuickBooks Desktop is running in its optimal shape. If not, the error resolution process can take more time and effort. To repair the QuickBooks Desktop application, act according to the below-given steps:

  • First things first, re-register the QuickBooks Desktop in Windows OS.
  • To do so, you will need to open the reboot.exe file.
  • Thereafter, move to the installed Microsoft.net framework, where you can perform the repairing process.
  • Now, reinstall the QuickBooks desktop to proceed further.
  • Once reinstalled, go with the QuickBooks update process.
  • In the end, run QuickBooks Component Repair Tool to repair the damaged components and damaged files.
  • This procedure will help you in getting rid of the QuickBooks unrecoverable error. If it fails, simply move to the next solution.

Solution – 2: Put QuickBooks Component Repair Tool To Work

QuickBooks Component Repair Tool is an excellent utility in the program that can help users repair the damaged components in the QuickBooks application. If you are having trouble with the program, this tool can certainly help. Follow the below-given steps:

  • First things first, install the QuickBooks component repair tool on your system before you proceed any further with the troubleshooting.
  • Once the tool is installed, you can put it to use.
  • You need to run this tool in the first place.
  • Thereafter, you have to follow the on-screen instructions with full attention.
  • Now try to update your Windows and then restart the system.
  • Finally, open QuickBooks and try to identify and troubleshoot the issues with the help of the installed tool.

It is possible that it will eliminate the error. If not, you have to follow the next solution.

Solution 3: Create a New Windows Admin User To Gain Full Permissions

Sometimes, insufficient admin permissions to perform a crucial task, such as repairing damaged Windows or QuickBooks components, can cause the error. QuickBooks unrecoverable error can also be resulted due to the same reason. In such a case, you can follow the below-given steps to create a new Windows admin user in Windows 10:

  • First of all, you have to click on the Start menu.
  • Next, go to the Settings menu to move ahead.
  • Thereafter, choose Accounts, wherein you need to click on the Family and other users tab.
  • Now go to Add someone else to this computer, which is located underneath the other user’s icon.
  • Move to the tab labeled “I do not have this person’s sign-in info” and select it next.
  • After that, go to Add a user with Microsoft Account.
  • Once done, give a name to the new account and click the Finish tab to conclude the task.
  • Also, you need to assign a password to safeguard the user account.
  • After assigning, go to the recently produced account.
  • Choose the Account type tab, and after that, you can go to the administrator tab.
  • In the end, click the OK button, and this procedure is finished.

If QuickBooks unrecoverable error still continues, try the next solution.

Solution – 4: Run Quick Fix My Program Using QuickBooks Tool Hub 

Quick Fix My Program is an important tool that can fix the QuickBooks program in a few minutes. You can access this tool using QuickBooks Tool Hub; therefore, you need to download and install the tool hub in the first place. Below are the steps:

  • Go to Intuit’s official website and download the latest release for the QuickBooks Tool Hub.
  • Next, install it on your system by following the given instructions.
  • Once installed, put it to use by agreeing to the given terms and conditions.
  • When in the tool hub, you need to move down and select Program Issues.
  • By making your selection, you will get to access Quick Fix My Program.
  • Running this tool will resolve the issues related to the QuickBooks program.

Ending Words!

The solutions described in this post can help you troubleshoot the QuickBooks unrecoverable error so that you can proceed further with your day-to-day accounting tasks. However, if you are getting technical hiccups when error resolution, it is wise to Contact QuickBooks trained professionals. Our call or chat consultation will guide you with sure and certain error resolution.

Delete TurboTax Account (Updated Method 2024)

Whenever you Google the best tax computing software programs, TurboTax will be on the top. Isn’t it? However, since we are discussing technology, errors, and glitches do occur while deleting such software accounts. So, if you’re also facing issues while removing your TurboTax account and searching for ways to Delete Accounts TurboTax, here’s your helping guide. Continue reading this post, apply the given instructions, and get the “Successfully deleted” message on your screen.

Looking for professionals to help you remove the TurboTax account and all the tax-related data? If yes, you can contact our certified team at +1-844-508-2335.

In this post, we will briefly talk about TurboTax, filing business tax returns, and how you can successfully delete TurboTax accounts. So, let’s begin!

What’s TurboTax – A Brief Discussion!

Intuit has introduced TurboTax for simplifying tax-related tasks and helping business accountants, taxpayers, or CPAs fill their tax returns in a more convenient and hassle-free manner. What makes the TurboTax unique and more productive than the other tax computing software is its clean and user-friendly interface. Its intuitive interface offers a simpler method for tax deductions along with add-on services and products essential for tax filings.

How Can Users Delete Accounts TurboTax?

Most probably, when you’ve searched “can I delete accounts TurboTax,” the search results would have appeared as “no, you can’t delete the TurboTax account, but only can deactivate your account. As long as you haven’t purchased the TurboTax Online application program (or activated a cost-free version), you can remove any data you’ve provided using the Clear and Start Over software feature.”

However, this is the truth, but you may delete your account using the ways given in the section below.

TurboTax Account Delete: 4 Easy Methods Users Must Apply

To find out what solutions can help users delete accounts TurboTax, you must follow and implement the procedures that are explained here. Continue performing the methods with the detailed instructions below:

Delete Procedure 1 – Manually Delete your TurboTax Account

Let’s manually execute the steps given below and try to remove the TurboTax account. Carefully follow each instruction.

  1. Firstly, to begin with this procedure, you must sign into your TurboTax account with the exact credentials, including username and password.
  2. In the next step, when you successfully log into the TurboTax account, hit the Take Me to Return option.
  3. After this, navigate to the top of the screen and hit the my available account option.
  4. Finally, click the Start over alternative and click the Yes button.

By this, you will be able to successfully delete accounts TurboTax. However, if the deletion is unsuccessful, continue with the next procedure.

Delete Procedure 2 – Take Help from the Control Panel to Delete your Intuit TurboTax Account

You must take a look at the following steps to apply the deletion procedure with the help of the control panel. Here’s how you must continue:

  1. Begin this procedure by first closing all the running application programs on your windows, including TurboTax. Also, make sure to close the related windows opened on the system.
  2. In the next step, navigate to the control panel on your computer system and move to the Programs and Features tab.
  3. Once you get the Programs and Features window, choose the uninstall program option.
  4. Here, you will get a list of applications installed on your system. From this list of applications, choose TurboTax.
  5. Now, hit the Uninstall button, and by this, you may delete your TurboTax account. In the end, if your account is still activated, move to the next procedure.

Delete Procedure 3 – By Starting Over and Deleting the TurboTax Account

You may find this procedure the same as the above ones and can be effective for those who have purchased the subscription TurboTax Desktop software version. Carry out the procedure as per the instructions below, and try to remove or deactivate your TurboTax account.

  1. Firstly, begin by signing into your TurboTax account by entering the exact login credentials, including password and user ID.
  2. Perform this procedure on TurboTax online and continue entering the TurboTax online ecosystem.
  3. Done up to this? Now, after successfully logging into the TurboTax online software, navigate to the Take Me to Return option and hit the same.
  4. In this step, you need to start over by navigating to the My Account option. Click this option, and move to the Start Over Option.
  5. Click this Start Over option, and the Start Over process will start. Here, you will get a window showing the notification of confirmation.
  6. Tap the Yes button, and now you’ll be asked to choose the TurboTax product you use.
  7. Select the product from the appearing list of product options, including mobile app, Online, CP/Download Mac, CD/Download Windows, and I don’t know.
  8. Now, your next step is to delete the account permanently, for which you must select the right option from the above ones.
  9. Following this, you’ll get a window stating, “I need to delete my account permanently.” Here, in this window, you must hit the Continue option from the very right corner of the screen.
  10. After this, you will be asked for verification. For this, you need to enter your name, email address, phone number, etc.
  11. Finally, after the verification, all your saved data in the TurboTax account will be removed permanently, along with the TurboTax account-related information as well. By this, you will remove everything related to your TurboTax account.

Delete Procedure 4 – Send an Email for Successful TurboTax Account Delete

By sending an email or submitting a request for your TurboTax Account Delete, you can remove or deactivate your TurboTax account that you no longer want to use. Follow the steps below, and continue deleting the account.

  1. Firstly, you must open your email ID registered with your TurboTax account.
  2. Now, send an email to “privacy@intuit.com” and continue putting a “request to delete my account” in the subject line of the mail.
  3. Here, in the email matter, you must describe the reason for deleting your TurboTax account. Once you’ve described the reliable reason, follow up with the next step.
  4. Finally, send the complete matter to end this procedure to delete accounts TurboTax successfully.

Still, your account is activated, and you’ve failed to delete it; let the next procedure help you deactivate or remove the account seamlessly.

Situations When Users Want to Delete Accounts TurboTax

There are times when you may wish to remove or deactivate your TurboTax account. The following can be one of the most prominent reasons for removing the TurboTax account. Take a look at the following potential causes:

  • When users wish to limit unused online accounts – Whatever the reason it may be, if users no longer wish to use their TurboTax account, eventually, they don’t want to keep critical business information online. It’s because there are many potential security threats and unauthorized access waiting to attack business confidential details.
  • If users are dissatisfied with services – If users have been using TurboTax for past tax returns and decided to use a different product, they may delete accounts TurboTax. Also, they may not want their sensitive tax details to stay saved on an unused account. In such circumstances, users wish to delete their accounts.
  • If users decide TurboTax isn’t right for them – Often, users sign up for TurboTax only to discover whether they require TurboTax or not for their tax preparation. And so, if users don’t want to continue the TurboTax services, they wish to delete the account.

Let’s Take Everything into An Account..!

Hopefully, by the end of this intuitive blog post, we hope you have learned how to delete accounts TurboTax. In case you still have any queries or failed to delete your TurboTax account, connect with us. You can reach out to our professionals via the available Live Chat Support option. Our certified team will help you deactivate your account professionally immediately after your approach..

Read also- installturbotax.com

How to Restore QuickBooks Company File from Local Backup?

Restore QuickBooks Company File – QuickBooks is quite an important software for users, and with the growing competition in the business arena, you may require it the most. Now you share a lot of data that help you complete the accounting and bookkeeping process a lot easier so you can’t afford these data missing. It will be a setback for you and your company, and it may destroy weeks of hard work. QuickBooks files may get corrupted due to some certain reasons, and you will not be able to access these data. So it is quite a wise step to restore QuickBooks files from the local backup. You can get the job done by following this blog until the end. But if you need additional support, you can call at QuickBooks support number and avail the expert guidance.

The process to restore QuickBooks company files:

  1. Open your QuickBooks and go to file menu where you need to select ‘Open or restore company.’
  2. Get the ‘restore a backup option’ and click on that to restore data from backup copy and proceed further by going next.
  3. In the next window, you will be asked to choose a location to restore the data. You can select ‘local backup‘ to restore it from the backup.
  4. Click on next to move further and continue by selecting any of the options from ‘Online backup’ and ‘local backup’ option.
  5. A dialog box will appear open named ‘open backup copy’ and navigate there to choose a local backup copy to restore.
  6. Next, you need to select ‘open’ tab in the same dialog box to go back to the ‘open or restore company’ tab.
  7. Now you will a get an option asking ‘where do you want to restore the file?’ Click next to respond.
  8. Then you can save the company file to a chosen location after clicking on ‘yes’ to overwrite the file.
  9. In the next box type ‘yes’ to delete the entire file followed by ‘OK’ to complete the overwrite process.
  10. You will be asked to enter your login credentials in the next dialog box but if you have not created username and password for administrator log in you need to go to the ‘sensitive data protection setup’ field and set a username and password.
  11. Confirm the password and click on to finish the process.
  12. Now you can enter all the transaction from a chosen date range to make it up-to-date and then you can close the window.

Also Read – Reset QuickBooks admin Password

Get customer support for further assistance: Since you have witnessed a lot of complexity while applying these steps, you may require expert support. So without any hesitation, you should promptly call at QuickBooks helpline number and avail the guidance and support from the QuickBooks professionals to get quality support.

How To Fix QuickBooks Error QBWC1085?

QuickBooks error QBWC1085 is an error that is related to an important utility known as QuickBooks Web Connector. This utility enables data sharing between QuickBooks Desktop and the online version of the program hosted on the web. Wen Connector is an efficient tool by Microsoft that can be integrated with any QuickBooks Desktop application which utilizes QuickBooks SKD or QB POS SDK.

You can download QuickBooks  Web Connector for free from Intuit’s official website and use it for connecting QuickBooks Desktop solutions with online services. However, when using QuickBooks Web Connector, you may experience various issues. One such issue is QuickBooks Error QBWC1085 we will discuss and troubleshoot in this post.

About QuickBooks Error QBWC1085

Before we hop into the troubleshooting solution, let’s under the error code QBWC1085 in the first place. The direct impact of error can be seen on Desktop version of QuickBooks Enterprise solution.

The error can prevent QuickBooks from exchanging data from any third-party web-based application. A damaged log file QWCLOG.TXT can be one of the main reasons behind the arrival of this error. When the error occurs, you will get to see an error message for the same on your screen, which states:

QuickBooks error QBWC1085 [Error Message]

“QBWC1085: QuickBooks was unable to write on the log file. QuickBooks will open without writing on the log file.

QBWC1085: There was a problem with the log file. QuickBooks Web Connector will continue without the log file.

Exception Type Error: Unknown name.”

When you see this error message on your screen, it is high time to start the troubleshooting procedures. However, it is crucial to understand its possible reasons in the first place.

What Reasons Can Evoke QuickBooks Error QBWC1085?

Some of the main reasons that can give rise to QuickBooks error message QBWC1085 are described in the below-given list:

  • The inability of the program to write to the web connector log file.
  • When the QuickBooks Web Connector-related TXT file becomes damaged or inaccessible.
  • You can make it work even with damaged components. You need to disable them during the startup.
  • When the web connector is trying to get information from a third-party web-based program.
  • You may see various other instances of the error 1005 to 1085 due to irregularities related to the log file.

Symptoms of Error Code QBWC1085 in QuickBooks

QuickBooks error QBWC1085 can be identified by various symptoms that it shows on the screen:

  • An error message appears on your screen, notifying you about the persisting issue.
  • Web Connector fails to perform an intended task.
  • Sluggish performance of the Windows.
  • A damaged QBWCLOG.TXT file.
  • Improperly working QuickBooks Web Connector components.

On noticing these symptoms, start working on the troubleshooting solutions without wasting your time.

How To Troubleshoot QuickBooks Error Message QBWC1085?

Now that we know the possible reasons behind the QuickBooks error QBWC1085, we can implement the right solutions to troubleshoot the problem. Below are some of the relevant solutions explained in simple language for you. Let’s start with the following:

Solution 1: Delete QuickBooks Web Connector

If you don’t run any third-party web-based application with QuickBooks, then you can simply disable/delete Web Connector by navigating through the list of automatic startup programs. It can help you avoid the QuickBooks Web Connector error QBWC1085. Follow the below-mentioned steps:

  • First things first, log into your Windows admin account.
  • Thereafter, open Windows File Manager and go to C:\ProgramData\ Microsoft\ Windows \Start Menu\ Programs\ Startup.
  • Moving ahead, you need to find and delete QuickBooks Web Connector from within the folder.
  • Restart Windows and now check if the QuickBooks online applications are working or not.

If the QuickBooks error QBWC1085 still persists, you need to perform the next solution.

Solution 2: Resolve QuickBooks Web Connector Error QBWC1085

Locate Web Connector from under the automatic startup programs list and make sure that it is running in the background. To enable the Web Connector, you need to perform the below-given steps:

  • Press Windows + R keys simultaneously on your keyboard and type MSConfig when the Run window opens.
  • Moving ahead, click OK and then click on the Startup tab.
  • Thereafter, locate and mark the checkbox for the QuickBooks Web Connector program in the list.
  • Now hit Apply button and then OK.
  • In the end, restart Windows and try to troubleshoot the damaged TXT file.

Solution 3: Rename QWCLOG.TXT File

As we have discussed, a corrupted QuickBooks Web Connector file (QBWCLOG.TXT) can give rise to QuickBooks error QBWC1085. In such a case, you need to rename the file to eradicate the existing issue. Below are the steps:

  • First of all, go to the QuickBooks Web Connector icon from the taskbar and right-click on it. After that, select Exit.
  • Next, launch Windows File Manager and go to C:\ ProgramData\ Intuit\ QBWebConnector \log folder.
  • Moving ahead, right-click the QWCLOG.TXT file and select Rename option from the drop-down menu.
  • Add .OLD at the end of the file name so that it looks like QWCLOGOLD.TXT and save it.
  • After renaming, restart the Web Connector application and move ahead.
  • Perform computer rebooting and open QuickBooks again.
  • Here, you may try using an online application integrated with QuickBooks and check if the QuickBooks Error QBWC1085 is resolved or not.

Solution 4: Connect The Company File To A Third-Party Program

Connect the company file to a third-party program by performing the below-given steps:

  • First, open the Run window (Windows + R) and once the run box opens, type in MSConfig and click the OK button.
  • Thereafter, click on the startup tab.
  • Checkmark the box for QuickBooks Web Connector.
  • Click Apply option and hit the OK tab.
  • In the end, conclude the process by resetting the system.
Ending Words!

Performing these solutions can help you get rid of the QuickBooks error QBWC1085. Get help from QuickBooks experienced professionals in troubleshooting the QuickBooks error code QBWC1085 and manage your business accounting with the utmost peace of mind.

How to Fix TurboTax not working 2024 (GoTaxation)

Are you unable to file your tax return due to the occurrence of the TurboTax Not Working issue? Well, don’t panic and go through this entire post. In this blog, you will get all answers to your queries so that you can tackle the issue without any inconvenience.

The users might encounter the TurboTax Not working issue while using the unsupported version of the TurboTax application. Apart from this, there are multiple other factors that may trigger the error. Therefore, we have discussed all such reasons along with the troubleshooting solutions in the further section of this post.

Reasons Why Users Come Across TurboTax Not working

It is essential to know the root causes that might trigger the TurboTax Not Responding issue so you can get rid of it instantly. Therefore, to update you regarding all such cases, we have listed some of them below;

  • You might experience this issue when the subscription of your TurboTax application expires.
  • Sometimes, it may trigger due to corrupt or damaged Windows Registry key permissions.
  • Another reason may be insufficient memory space on the hard disk.
  • The TurboTax not working issue may be caused by the interruption of the virus or other malicious activities.
  • Low memory space in the hard drive may also be responsible.
  • Corrupt Windows files might also give rise to the error.

Once you have cleared all your doubts regarding why you might end up with the TurboTax Not Responding issue, let’s move ahead on how to fix the issue.

Prerequisites Required Before you Troubleshoot TurboTax Not Working issue.

Before resolving the TurboTax not working issue, it is essential to remember a few points in your mind. Go through the points listed below attentively so that you can resolve the issue without any hassle.

  • You must ensure that your system fulfills the basic system requirements necessary to run the TurboTax software smoothly on your device.
  •  Also, you must ensure that you are using the latest version of the Microsoft .NETFrameowrk on your system. If you are accessing a version lower than 4.5.2 you are required to download and install Microsoft .NETFramework 4.5.2 on your system.
  • The users need to run the TurboTax application with the proper administrator rights. If you encounter the TurboTax Not Responding issue, you can resolve it by running the application with admin rights.
  • End all the background processes and try to run the TurboTax software so that you can use the application smoothly on your device.
  • Moreover, you must ensure that you are well-connected with a stable and good internet connection.

Steps to Troubleshoot TurboTax Not Responding on Windows 7

The users might encounter TurboTax not working due to issues with the  installer on your PC. Therefore, the best way to tackle the issue is to allow administrative rights to the TurboTax Setup file.

  • To initiate the process, look for the downloaded setup file “TurboTax.exe“.
  •  Once you get the downloaded setup file, right-click on it. Further, tap on the Properties option from the context menu.
  • Now, move to the Compatibility tab from the Properties window and then mark the “Run this software as an administrator” checkbox.
  • Also, ensure that you have marked the checkbox of “Run this program in compatibility mode”.
  • You must verify that you are accessing the newly launched version of Windows and exit after accepting the modifications.
  • The user is supposed to cross-check all the prompts that ask for the confirmation of your administrator access.
  • In the end, double-tap on the installer to start it and then verify whether the issue still persists.

Steps to Troubleshoot TurboTax Not Responding on Windows 10 issue

  • You must ensure that you are well-connected with a stable and high-speed internet connection.
  • After this, you have to ensure that your router is properly connected and the internet is of sufficient strength.
  • You are expected to get the most recently launched version to enjoy more features of the TurboTax software.
  • Don’t forget to remove the browser’s cache and cookies. Also, ensure that no background processes are running in the background.

Steps to Perform when TurboTax Not Responding on Mac devices

If you are having trouble while accessing the TurboTax software on your Mac device due to TurboTax Not Working issue; then follow the steps listed below:

  • Insert the TurboTax installation CD on your Mac device to initiate the process.
  • After this, hover your cursor over the “Show in Folder” option.
  • Once you open the folder, pick the required TurboTax version and then right-click on it.
  • Following this, tap on the Open option, and it will initiate the installation process.
  • Once the TurboTax software is installed, you can use the application to file federal or state taxes.

Steps  TurboTax Not Working on iPhone

  • Firstly, open your iPhone and then move to the Settings option.
  • After this, access the list of all the applications that is installed on your mobile phones.
  • Next, you must ensure that you have completely uninstalled the TurboTax application from your iPhone.
  • Once you have downloaded the software successfully, download the TurboTax application again and verify whether the issue is resolved.
    • Besides this, you must upgrade or InstallTurboTax application and then verify whether it works or not.

When TurboTax Not Responding on iPad

  • In the initial stage, ensure that your iPad is well-connected with a stable and high-speed internet connection network.
  • After this, you must make sure that the TurboTax 2020 is installed successfully on your device and is upgraded to the most currently launched version.
  • You must ensure that you have deleted all your browser’s cache and cookies.
  • Now, you must ensure that you have completely uninstalled all the unnecessary cookies and cache files from your system.

Steps TurboTax Not Working On Chrome

There might be certain instances when users encounter TurboTax Not working issue while working on the Chrome browser. However, if you are also encountering the same issue, follow the steps listed below to fix the issue.

  • In the first step, open the Google Chrome browser on your device.
  • Afterwards, tap on the three horizontally placed dots at the screen’s top-right corner.
  • Choose the Settings option from the extended list of options.
  • Now, opt for the “Privacy and Security” option on the screen’s left side.
  • After this, choose the “Privacy and Security” tab followed by the “Clear Browsing Data” option.
  • You are supposed to change the time range as “All Time” and then mark all of the checkboxes.
  • Finally, tap on the “Clear Browsing Data” option, which deletes all your unnecessary browsing data, files, cache, and cookies.
Final Thoughts!

Here, we have arrived at the end of this post and hope you can easily eliminate the TurboTax Not Responding issue by following the troubleshooting methods listed above. If you still have any doubts regarding this issue, you must contact our TurboTax professionals. Our professionals are ready to help you in the best possible manner as soon as possible. To consult our experts, you can use the email or live chat support facility and can get all answers to your queries.

Where Do I Enter or Delete 1099-R in TurboTax?

Ensure that this amount is listed on line line 4b or 5b of form 1040.   s The 1099-R Form is used by businesses to report the distribution of retirement benefits like pensions and annuities. Moreover, the taxpayer who receives a distribution of more than $10 will receive a Form 1099. In addition to this, the Form is also used to keep the track record of death or disability benefits that may be paid to the beneficiary’s estate.

At times, taxpayers need to delete the 1099-R Form in TurboTax when they have sent it by mistake. However, if you are looking for the proper instructions to edit or delete 1099-R Form in TurboTax, then you must read the entire blog thoroughly.

What do you mean by Form 1099-R?

Whenever the user wants to take out the money from the retirement account for any reason, you will receive Form 1099-R in TurboTax. This Form is also known as “Distributions From Pensions, Annuities, Retirement, or Profit-Sharing Plans, Insurance Contracts, etc. The retirement account falls under the categories such as Annuity and pension payments, loans against pension plans, early retirement account distributions, and retirement account rollovers.

Basically, Form 1099-R is used to outline income on your federal tax return. If you noticed that the Form represents federal income tax withheld in Box 4, you have to link a copy-B along with your tax return. The users can’t receive the Form after January 31 after the retirement account distribution.

Also Read – How to Remove form 7202 from TurboTax?

Understanding who can file the Form 1099-R

According to the Internal Revenue System (IRS), an organization that handles any one of the following accounts can file for Form 1099-R. Also, ensure that before filing the Form, the entity’s distribution must be above $10.

  • Profit sharing or retirement plans
  • Charitable gift annuities
  • One must have an individual retirement account (IRA)
  • Also, the entity must have permanent and total disability
  • payments under the life insurance contracts.
  • Annuities, pensions, insurance contracts, or survivor income benefit plans.

Stepwise Instructions to File Form 1099-R

The 1099-R Form is provided to the users by the plan issuer, who must send one copy of it to the IRS.
Apart from that, you have to send a copy of the Form to the recipient of the distribution, recipient state, city, or to the local state department. Moreover, the taxpayer must also ensure the Form must also consist of the payer’s name, address, telephonic number, and taxpayer identification number (TIN).

Moreover, this Form must also include the recipient’s name, address, and taxpayer identification number, which is usually used as Social Security Number for individual taxpayers. In case the users receive the Form 1099-R in error, they should directly get in touch with the plan custodian to fix the situation and avoid filing the inappropriate tax return.

Important Information Included within the Form 1099-R

Below we have described all the Information that is included with Form 1099-R in TurboTax.

  • Box 1:- This field records the total amount of distribution you get from a retirement plan or annuity. Basically, it is the estimated amount of dollars you acquired from the plan. This amount would be taxable or not, depending on numerous factors.
  • Box 2:- This column reveals the amount you have received from the retirement plan or annuity.
  • Box 4:-  It basically summarizes the amount the payer withheld from distribution. This amount is very useful as it mentions the amount the users have already paid on the distributed amount.
  • Box 7:- It represents the distribution code to identify the taxability of the distribution. The code will be represented by a code number or letter if the payer recognizes whether the distribution was a loan or a rollover. You will notice that the codes are mentioned on the back side of Form 1099-R.
  • Box 9b:- This field outlines the investment made by a user for a life annuity under the qualified plan or a 403(b). In other words, these are the amounts that are already taxed.
  • For every taxpayer, it is mandatory to remember this number to identify the taxable amount of a distribution recorded in Form 1099-R.

Procedure to Enter 1099-R in TurboTax

If the user gets $10 or more than that from the retirement plan, then they get a Form 1099.

Doesn’t matter if the distribution is taxable or not, the user has to report a Form 1099-R. Below we have listed some of the simple steps using which you can easily enter 1099-R in TurboTax without any hassle.

  • To begin the process, move to Form 1099-R and then add your pension, annuity, or other retirement plan distributions.
  • After this, on the screen of “Did you get a 1099-R?”, enter “Yes” on your computer screen.
  • Now, opt for the Add Another 1099-R if you reach the “Review your 1099-R info” screen.
  • If your bank is in partnership with TurboTax 1099, you may also import your Form.
  • Moving ahead, pick your institution from the list of options and then add the login credentials.
  • Further, tap on the Get my form option to initiate the import process.
  • If you want to upload your Form 1099-R or write in the info itself, click on the “Change how I enter my form” option. Then, from the upcoming screen, opt for the entry method as per your suitability.
  • You must continue giving answers to the questions to add or review the info from Form 1099-R.

Procedure to Delete 1099-R in TurboTax

The users need to delete Form 1099-R in TurboTax whenever they find any error while filing this tax form.

However, if you don’t have any clue how to remove the Form 1099-R in TurboTax, then go through the stepwise instructions listed below attentively:

  • In the initial stage, open your Tax return in TurboTax on your system.
  • Afterwards, navigate for the 1099-R Form and then from the search results, tap on the “Jump to” link.
  • Consequently, it will redirect you to the “Review your 1099-R info” screen. Now, choose the Trash option next to your 1099-R Form and answer the Yes option.
Ending Words

With this, we have arrived at the end of this post and hope that the Information provided will help you to enter or delete 1099-R in TurboTax.

If the steps mentioned above doesn’t resolve your query, then you must connect with our TurboTax professionals. You can consult with our experts through email or chat facility.

How To Fix TurboTax Error 7001? (Troubleshooting Steps 2023)

TurboTax Error 7001 is a flawless tax-preparation software that enables businesses to file their tax returns on time. It is an excellent software that makes the tax filing process much more convenient and easier. Despite having numerous benefits, TurboTax is still prone to certain technical snags. One of them is TurboTax , which might appear while working on TurboTax with an unstable internet connection.

TurboTax Error 7001

However, if you are also the one who gets stuck with Error 7001 in TurboTax, then you must go through this entire post. We have enlisted all the possible troubleshooting solutions and the factors that lead to the error below.

Reasons Why Users Encounter TurboTax Error 7001

Knowing the root cause behind the occurrence of TurboTax Error 7001 is mandatory to resolve the issue immediately. To make it simpler for you, we have listed some of the causes that might evoke the error, which are as follows.

  • You might encounter the error while accessing TurboTax on a workstation instead of a PC.
  • Sometimes, the users might strike TurboTax Error 7001 due to an interrupted and poor internet connection network.
  • It might evoke if the user doesn’t have enough permissions to run the TurboTax program. Also, it may appear when the user requires special privileges to access the software.
  • There might be the possibility that the Windows Firewall or any third-party security application is interrupting TurboTax from running on your system.
  • You might be using an outdated version of the TurboTax software.

Best Resolution Methods to Eliminate TurboTax Error 7001

Now, we have reached the most important section of this post i.e., troubleshooting. Below we have mentioned some of the quick resolution methods using which you can easily resolve the issue.

Method 1: Verifying The Network Connection and Hardware

As discussed above, the TurboTax error might arise due to issues with the network connection. Therefore, to resolve the issue, you must verify the network connection by following the steps listed below;

  • Initially, move to the Wireless Access Point module and then try to login twice.
  • After this, try to log out of your Windows account and then turn off your PC.
  • Further, close all other network hardware, including router, cable modem, etc. Then, restart all of them one by one with a gap of 1 minute after turning each one of them.
  • Once you have restarted all the hardware, you must log into your TurboTax again.

Method 2: Use the Admin Permissions to run the TurboTax 

Go through the following instructions listed below to run the TurboTax using the admin permissions.

  • Ensure that you have closed the TurboTax application if it is already open on your system.
  • Afterwards, right-click on the icon of the TurboTax from the Desktop and click Run as Administrator.
  • If you notice that the Run as Administrator option isn’t available, move to the Properties option.
  • Further, opt for the Compatibility option and then mark the “Run this program as administrator” checkbox.
  • Soon after this, tap on the Apply option followed by the Ok.

Also Read – How to Transfer TurboTax from One Computer to Another

Method 3: Installation of the TurboTax software in Selective Startup Mode

  • To begin the process, click on the Windows menu and type “Run” within the search column.
  • Consequently, it will open the run window on your computer screen.
  • In the Run window, type “msconfig” and hit the enter key on your keyboard.
  • By doing so, a window with the title indicating System Configuration Utility will pop up on your computer screen. In the same window, look for the General tab and then tap on it.
  • Now, tap on the Services tab located right next to the Boot tab.
  • Afterwards, beneath the Services tab, mark the checkbox next to “Hide All Microsoft Services”. Then, confirm it by tapping on the “Disable All” option.
  • Thereafter, tap on the Ok option and then restart your system if prompted.
  • Finally, try to install the TurboTax software again and see if this issue is resolved.

Method 4: Upgrade the TurboTax software to the latest version

At times, users might encounter TurboTax Error 7001 while using the outdated version of the software. Therefore, to resolve the issue, you must update it to the most recently launched version. For that, you must perform the stepwise instructions listed below:

  • If you are using a PC, launch the TurboTax software on your system.
  • After that, opt for the Check For Updates option from the online menu situated at the top of the screen.
  • Whereas, if you are a Mac user, you need to close and re-open the TurboTax. If any updates are released, you will be prompted to download it on your system.

Tips: 

  1. While updating the TurboTax software, you must be connected with a high-speed internet connection. It is important to save both times and to minimize data corruption.
  2.  In case your connection interrupts you in the middle of the updating process, then try again. The process will resume from where it was left.
  3. If you are encountering issues while updating the latest updates of the TurboTax on your PC, try updating it manually.

Method 5: Try Opening TurboTax on PC:-

The user is recommended to run TurboTax software on the workstation. This is so because the workstations have a well-built firewall which hinders communication of TurboTax Online.

Method 6: Configuration of the Windows Firewall Settings 

Windows firewall blocks some unknown websites and applications from accessing your system for security purposes. Similarly, Windows Firewall also blocks the access of TurboTax and interrupts while running on your system. As a result, it may lead to TurboTax Error 7001.

Closure

Here comes the end of this blog, and hope you can now easily overcome TurboTax Error 7001 by following the resolution methods listed above. We have tried our best to provide you with all the important information required to troubleshoot the error. However, if the error persists, you may connect with our professionals via email or live chat facility. You will get the best possible assistance from our TurboTax Support experts within the shortest span of time.

How to Transfer TurboTax from One Computer to Another?

Step Millions of US taxpayers find it easy to file tax returns thanks to TurboTax, a tax preparation software. To use TurboTax users are required to enter details about their personal as well as business finances in order to accurately calculate their taxes. TurboTax also gives users control over their data, allowing them to transfer information from one computer to another.

If you are not sure about the TurboTax data protection features you should call the TurboTax customer service number and speak to a trained professional about how to protect your tax info. This article gives you a general idea about the steps involved when attempting to transfer TurboTax from one computer to another.

transfer turbotax to other computer

The End User License Agreement of TurboTax allows you to install the TurboTax software on any computer you own. Users can even transfer their tax returns to a new computer so that they do not have to start from the beginning whenever they want to access their TurboTax account.

Steps to Follow when Installing TurboTax

The first thing you need to do is to installturbotax software on the computer to which you want to transfer your TurboTax files. You can follow the steps mentioned below to install TurboTax on your system:

Step 1: Close all the background applications on your computer before installing TurboTax. It is also recommended that you disable the firewall and temporarily pause your anti-virus software as it may disrupt the installation process. But you must remember to reactivate both the firewall and the anti-virus once the TurboTax installation is complete.

Step 2: There are two ways to install TurboTax, by using a CD or by downloading the software online. If you have the TurboTax CD then you just need to insert it in the optical drive of the computer and select the option to “Run setup.exe”. On the other hand, if you downloaded TurboTax online you just need to double-click the installer file and agree to the license agreement.

Step 3: In case you want to install the software in a particular folder, click ‘Change’ and select the folder you want and then click ‘Install’.

Steps to follow to “Transfer TurboTax Data”

Now that you have successfully installed TurboTax on the new system you can use the steps mentioned below to transfer your tax returns onto the new computer”

  1. Open TurboTax on your old computer and go to the File menu.
  2. Click on ‘Save As’ and select the destination folder
  3. Enter a name for the backup file and click ‘Save’ to export
  4. Transfer the file to the new computer using a pen derive or CD
  5. Double-click the file to open it and continue the work from where you left

As far as possible you should avoid sending tax returns over email as it may pose a security risk. You can call the TurboTax support number and speak to a trained technician if you have any problem accessing or transferring your while using TurboTax.

You May Also Like: How to Fix TurboTax E-Filing Transmission Issues