All posts by admin

How to Fix QuickBooks Error H505 in Multi-User Mode?

QuickBooks Error H505 appears when a workstation fails to communicate with the server hosting the company file. This error mainly occurs while switching to multi-user mode or while opening a shared company file over the network. In most cases, the problem is related to incorrect hosting settings, blocked firewall ports, damaged network files, or inactive QuickBooks services.

This guide explains the exact causes of the H505 error and provides tested troubleshooting methods to restore multi-user access safely.

What Causes QuickBooks Error H505?

QuickBooks may fail to connect to the server due to several network or configuration-related issues.

Below are the most common reasons:

  1. Incorrect Hosting Configuration

Only the server computer should host company files in multi-user mode. If hosting is enabled on a workstation, QuickBooks fails to create proper communication with the server.

  1. Firewall or Security Software Blocking

Windows Firewall or third-party antivirus software may block the ports required by QuickBooks Database Server Manager.

  1. Damaged or Missing .ND File

QuickBooks uses a .ND file to locate the company file over the network. If the File becomes damaged, workstations may lose access to the server.

  1. QuickBooks Services Not Running

Background services such as QBDBMgrN and QBCFMonitorService must run continuously on the server system.

Signs of QuickBooks Multi-User Error H505

When QuickBooks multi-user error H505 comes, it usually gives warning signs before completely blocking your workflow. Here is how you can easily identify if your system is facing this network glitch:

  1. QuickBooks fails to switch to multi-user environment.
  2. The company file does not open on workstations.
  3. The application freezes while accessing shared files.
  4. Error H505 appears on the screen.
  5. QuickBooks crashes during startup.

What to Do Before Resolving QB Error Code H505?

Before performing advanced troubleshooting:

  1. Save a local backup copy of your company files to prevent data loss during network resets.
  2. Verify that your QuickBooks Desktop is updated to the latest release version.
  3. Ensure the QuickBooks Database Server Manager is installed and ready on your server machine.
  4. Ask all users to log out of QuickBooks temporarily.

Top 5 Proven Solutions to Fix QuickBooks Error Code H505

Follow the simple and effective solutions given below to address error code H505 in QuickBooks Desktop.

Solution 1. Disable Hosting on Workstations

If hosting is enabled on multiple computers, QuickBooks may become confused about which system is acting as the server. Only the dedicated server computer should host company files.

Steps to disable hosting:

  1. Open your QuickBooks on any workstation where you face H505.
  2. Go to the File menu at the top left and click on the Utilities tab.
  3. If you see the Host Multi-User Access option, don’t select it. Move on to the next workstation. This one is not causing the QB error h505.
  4. If you see Stop Hosting Multi-User Access is an option, select it.
  5. Now, you have to repeat these steps for all workstations where you get error H505.

Once all regular workstations are set up correctly, check your main server computer. Go to File, click on Utilities on the server, and ensure that Host Multi-User Access is the active setting.

Solution 2. Check Windows Firewall Settings

Sometimes your security firewall blocks QuickBooks from communicating with the server, which causes an error message H505 in QuickBooks.

Follow these easy steps to fix it:

  1. Open Control Panel, and click on Windows Defender Firewall.
  2. Choose Allow an app or feature through Windows Defender Firewall.
  3. Click Change Settings and ensure QuickBooks is checked for both Public and Private networks.
  4. If QuickBooks is not listed, click Allow another app, browse to your QuickBooks folder, and select the application file.
  5. Once added, ensure the public option is checked and hit OK.
  6. Restart QuickBooks and try to open the data file again to check if the error message H505 in QuickBooks is resolved.
  7. If it still persists, move to the next solution to fix the error code H505.

Solution 3. Reset Your Network Data (.ND) Files

QuickBooks uses .ND file to manage connection links between your workstations and the server. If this file gets damaged, you will get a QuickBooks error H505.

Follow these steps to reset it:

  1. Go to your main server computer and open the folder where your QuickBooks company files are stored.
  2. Look for a file that shares the exact name as your company file but has .nd at the end of its name.
  3. Right-click that file and select Rename. Type .old at the end of the file name.
  4. Go back to your workstation and open QuickBooks. The software will automatically create a new network file to restore your shared access.

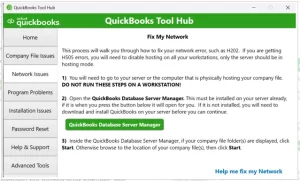
Solution 4. Run QuickBooks Database Server Manager

If your connection is still blocked, use the QBDBMgrN to automatically scan your network setup and repair communication errors.

Follow these steps to repair it:

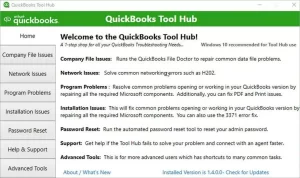
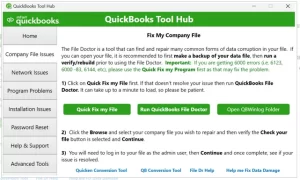
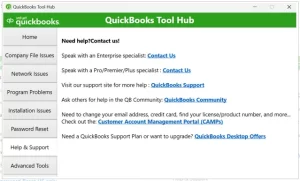
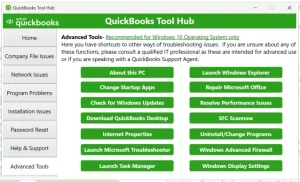
  1. Open the QuickBooks Tool Hub on your server computer and click on the Network Issues tab.
  2. Click the QuickBooks Database Server Manager button from the menu.
  3. Find your company file folder inside the tool window. To find a specific File, click Browse to choose your folder, then click Start Scan.
  4. Wait for the tool to finish scanning. It will automatically detect and fix background network bugs and firewall path conflicts.
  5. Once the process shows a success message, close the tool, open QuickBooks on your workstations, and change your settings to multi-user mode.

Solution 5. Verify Folder Permissions for the Company File

QuickBooks software require full permission to access the shared company file folder. If Windows folder permissions are blocked, QuickBooks may fail to connect to the server and show error H505.

Steps to verify folder permissions: 

  1. Go to the server computer where the QuickBooks company file is stored.
  2. Open the folder containing your company file.
  3. Click right in the folder and select Properties.
  4. Open the Security tab and click Edit.
  5. Select the Windows user account used for QuickBooks access.
  6. Ensure the following permissions are allowed:
    1. Full Control
    2. Modify
    3. Read
    4. Write
  7. Click Apply, then select Ok.
  8. Open QuickBooks again and try accessing the company file in multi-user mode.

Tips to Prevent QuickBooks Error H505

You can reduce the chances of QuickBooks Error H505 occurring by following these preventive measures:

  1. Keep your QuickBooks Desktop updated to the latest release version.
  2. Enable hosting only on the server computer.
  3. Regularly update Windows Firewall and antivirus settings.
  4. Store the company file in a stable shared network folder.
  5. Run QuickBooks Database Server Manager after changing network settings.
  6. Verify that QuickBooks services such as QBDBMgrN remain active on the server.
  7. Create data backups of your company file to avoid data loss during network failures.

To Wrap Up

QuickBooks Error H505 is a network-related issue that prevents workstations from accessing the company file in multi-user mode. You can fix the error by correcting hosting settings, repairing damaged network files, updating firewall permissions, and verifying server access. Once the connection is restored, users are able to open the data file and continue working in multi-user mode normally.

To avoid similar issues in the future, keep QuickBooks Desktop updated, maintain proper server configuration, and regularly monitor network and firewall settings.

Frequently Asked Questions

  1. What does QuickBooks Error H505 mean?

QuickBooks Error H505 indicates that the workstation cannot connect to the server computer hosting the company file in multi-user mode.

  1. Can firewall settings trigger Error H505?

Yes. Windows Firewall or third-party antivirus software may block QuickBooks network communication and prevent workstations from accessing the company file.

  1. Does QuickBooks Database Server Manager help fix H505?

Yes. QuickBooks Database Server Manager scans the company file folder and repairs network-related communication problems in multi-user mode.

  1. Can multiple systems host QuickBooks company files?

No. Only the dedicated server computer should host company files. Enabling hosting on multiple systems may trigger H-series errors like H505.

How to Make a Journal Entry in QuickBooks? An Easy Guide

The journal entry in QuickBooks Online is an advanced accounting tool used for recording financial transactions when standard forms like invoices, bills, or checks do not apply. However, most daily tasks are automated in the software; knowing how to make a journal entry in QuickBooks is essential for manual adjustments and other accounting needs.

This guide explains how to create a journal entry in QuickBooks Online and how to delete a journal entry in QuickBooks if you ever need to reverse a mistake.

Why Use QuickBooks Journal Entry?

While standard forms like receipts or invoices automate most accounting tasks, a general journal entry in QuickBooks is necessary for specific, manual financial adjustments.

You should use a QuickBooks online journal entry for the following accounting needs:

  1. Correcting Mistakes: Fix transactions posted to the wrong account or period without altering the original document.
  2. Recording Depreciation: Record yearly or monthly depreciation of vehicles, machines, and buildings.
  3. Entering Payroll Data: Input total wages, taxes, and liabilities using a payroll journal entry example in QuickBooks.
  4. Adjusting Account Balances: Manually balance your books at year-end or period-end based on CPA recommendations.
  5. Handling Loan Interest: Separate the principal payment from the interest expense on business loans.
  6. Traditional Accounting: Provide your external accountant with a direct way to make compliance adjustments in your ledger.

How to Create a Journal Entry in QuickBooks Online?

A general journal entry in QuickBooks allows you to record a transaction manually without using a standard form like an invoice or bill. For every QuickBooks Online journal entry you make, your total debits and total credits must be equal to keep your books balanced. You can use this method to track income, record expenses, or shift funds between your accounts.

Prerequisites

Before you create a journal entry in QuickBooks, make sure you understand the basics of debits and credits. If you are unsure which accounts to impact, consult your accountant to prevent errors in your general ledger.

Simple Steps to Create a Journal Entry

Follow these steps to create a new journal entry in QuickBooks Online:

  1. Click the + New or + Create button in the top left corner.
  2. Select a journal entry from the list of options.
  3. On the first line, choose an account from the Account field drop-down.
  4. Enter the transaction value in either the Debits or Credits column.
  5. On the next line, select the other account you want to move money between.
  6. Enter the exact same amount in the opposite column to balance your debits and credits.
  7. Remember, the software often auto-populates the matching amount in the opposite column on the second line automatically.
  8. Repeat the process for more accounts if needed, ensuring total debits still equal total credits.
  9. Write a clear description in the Memo section so you know the reason for the entry later.
  10. Click Save and close to exit the window.

After saving your general journal entry in QuickBooks, the transaction immediately updates the general ledger. You can easily view the recorded entry by checking your specific account history or running a dedicated journal report to see all your general journal entry QuickBooks transactions in one place.

How to View a QuickBooks Online Journal Entry?

Once you save a transaction, you can easily view the entries later. You have two methods to find 

and view your QuickBooks online journal entry:

Method 1. View via Account History

  1. Go to Settings and choose Chart of Accounts.
  2. Find the specific account you used in the general journal entry in QuickBooks.
  3. Click View register in the action column.
  4. Scan the list for the word “Journal” in the Type column to see the details.

Method 2. View via the Journal Report

  1. Navigate to the Reports section and then select Journal.
  2. Within the report window, click the Customise button to filter the entries.
  3. Choose your target date range from the Report period drop-down.
  4. From the Filter drop-down, check the Transaction Type box and choose Journal Entry from the options.
  5. Click Run Report to display all your recorded journal entries.

How to Delete a Journal Entry in QuickBooks Online?

Now you have learned how to make a journal entry in QuickBooks Desktop. If you need to make corrections, you can easily reverse a QuickBooks Online journal entry to update your ledger. Alternatively, if you created the transaction by mistake, you can delete it entirely.

How to Reverse a Journal Entry

In case you need to make corrections within two different accounting periods or fix a balance error, follow these steps. This process simply swaps the existing debits and credits; it does not remove the original general journal entry. QuickBooks:

  1. First, navigate to All Apps and choose Accounting, then select Chart of Accounts.
  2. Find the specific account that created the journal entry for and select Account history.
  3. Next, find the journal entry in the register. Look for the word “Journal” in the Ref No. or Type column.
  4. Select the specific journal entry line to expand your view, then click Edit.
  5. Click Save, then select Reverse from the action menu.

When you reverse a journal entry, QuickBooks automatically creates a new journal entry to balance it. This ensures a clean audit trail while making a few automated adjustments:

  1. The new journal entry keeps the original journal no. and attaches an “R” with it. This means it’s reconciled.
  2. It will be dated the first day of the month following the original journal entry date.
  3. It will hold the information like account, name, and description, just like the previous journal entry.

How to Delete a Journal Entry

If you created a transaction by mistake, use these steps to permanently wipe it from your ledger. Make sure you are completely certain before proceeding, as removing an entry can immediately unbalance your books:

  1. Go to All Apps, choose Accounting, and open your Chart of Accounts.
  2. Locate the account associated with the mistake and click Account history.
  3. Scroll to find the target transaction labeled Journal.
  4. Select the entry line to open the detailed view.
  5. Click Delete at the bottom of the screen, then select Yes to confirm the pop-up warning.

Final Thoughts

Hopefully, now you have understood how to make a journal entry in QuickBooks easily. By following the above simple guide, you can ensure that your business’s financial records are accurate and updated. Managing a general journal entry or QuickBooks transaction properly keeps your books balanced and your audit trail clean.

With these steps, you are fully prepared to manage any manual adjustments while keeping your bookkeeping precise and reliable.

Frequently Asked Questions

Question 1. What is a journal entry in QuickBooks?

A journal entry in QuickBooks is a manual, double-entry bookkeeping tool used to record financial transactions directly into the general ledger when a standard form is not suitable.

Question 2. How to delete a journal entry in QuickBooks Online?

The process of deleting a journal entry in QuickBooks Online is quite straightforward. You need to access the Chart of Accounts and go to the Account that you want to remove. Open the register and then simply click delete.

Question 3. How to make a journal entry in QuickBooks Online?

Making a journal entry in QuickBooks Online is used for complex transactions, adjusting entries, or corrections that do not use standard forms like invoices or bills.

Question 4. How to change a journal entry in QuickBooks Online?

To change a journal entry in QuickBooks Online, you can locate the entry through the search bar or reports, update the details directly, and save the changes.

Question 5. What are the three types of journal entries?

The three basic types of entries frequently mentioned for keeping the books of accounts updated are adjusting entries, closing entries, and reversing entries.

What is QuickBooks Script Error & How to Fix It Permanently?

Have you ever faced a QuickBooks Script Error message while handling your company file? This is one of the most frequently occurring technical errors when the program is unable to communicate with any web page or online service. These interruptions can disrupt your business productivity, so it’s better to fix this error immediately.

In this quick guide, we will learn how to resolve QB script errors so you can get back to your accounting without further delays.

What is QuickBooks Script Error?

A QuickBooks script error code 0 is a technical glitch that occurs when the software fails to connect with an online server or load a webpage correctly. Because QuickBooks uses browser-based components to display your dashboard and tools, any interruption in that connection triggers a “script” failure.

Here is what you need to know about this error:

  1. When QuickBooks can not “read” the web code needed to display specific features or windows.
  2. It is caused by outdated browser settings, high security levels, or a full “cache” that can block the software.
  3. You will see this error when you open the program or when trying to sync a bank feed or transaction.

Key Symptoms of a Script Error in QuickBooks

Identifying the QuickBooks desktop script error early allows you to fix it before it disrupts your workflow. If you are experiencing any of the following symptoms in QuickBooks Desktop, you are dealing with a script-related conflict:

  1. Frequent script error messages are displayed after opening a function or transaction.
  2. QuickBooks becomes unresponsive or crashes and restarts unexpectedly.
  3. Significant delays when clicking buttons or trying to move between different screens.
  4. Slow internet speeds within the software, and constantly process time-out warnings.
  5. A noticeable lag where your keyboard and mouse commands are not processed immediately.

What are the Causes Behind the QB Script Error Code 0?

There are several factors that can trigger a Script Error when I Open function or transaction. Understanding these causes is the first step toward a permanent fix. The most common reasons include:

  1. When QuickBooks script processing tools or functionalities are disabled.
  2. Your browser script debugging feature is enabled, which forces error notifications to pop up.
  3. Corruption within your Windows system files may have caused this error code 0.
  4. Recent system updates or setting changes were not correctly saved or verified.
  5. A mismatch between your downloaded internet data and the script software requirements.

Easy Solutions to Resolve QuickBooks Script Error Line 0

If you are seeing a Script error after opening a function, follow these troubleshooting steps to clear the glitch:

Solution 1. Disable Script Debugging in Windows

This is one of the most effective solutions to stop QuickBooks script error line 0 from popping up.

  1. Open the Internet Options window via the Control Panel.
  2. Click on the Advanced tab.
  3. Scroll down to the Browsing section in the list.
  4. Check the boxes for:
    1. Disable script debugging (Internet Explorer)
    2. Disable script debugging (Other)
  5. Uncheck the box that says Display a notification about every script error.
  6. Click Apply at the bottom and then OK.

Solution 2. Clear Browser Cache and Cookies

If browser cookies, history, or temporary Internet files are causing the script error 0, clearing the cache data will resolve the problem efficiently.

  1. Open your Internet Explorer and click on Internet Options.
  2. Under the General tab, look for the Browsing history section.
  3. Click Delete.
  4. Select Temporary Internet files, Cookies, and History.
  5. Click Delete, then OK.
  6. This will help you resolve the script error in QuickBooks without any further delay.

Solution 3. Add Intuit as a Trusted Site in Internet Explorer

QuickBooks uses Internet Explorer to open the services. Ensure you have made Internet Explorer the default browser on your system.

  1. Open the Control Panel and select Internet Options.
  2. Navigate to the Security tab and click on Trusted Sites.
  3. Click the Sites button.
  4. In the “Add this website to the zone” field, type intuit.com and click Add.
  5. Uncheck the box for “Require server verification (https:) for all sites in this zone.”
  6. Click Close, then OK. Now, check if the QB Script Error is resolved.

Solution 4. Reset Internet Explorer to Default Settings

If the script error continues, resetting the browser to its factory state often fixes the configuration issues.

  1. Go to Internet Options and select the Advanced tab.
  2. Click the Reset button at the bottom.
  3. In the confirmation box, click Reset again.
  4. Click Apply and OK to finish.

Solution 5. Disable Browser Add-ons

Sometimes, third-party extensions can interfere with how QuickBooks processes web data.

  1. Open Internet Explorer and click the Tools gear icon.
  2. Select Manage Add-ons.
  3. Locate the add-ons and click Disable for each one.
  4. Restart QuickBooks to see if the script error in QB persists.

Solution 6. Reactivate Internet Explorer 11 on Windows 10

If the internal browser is glitching, refreshing it through Windows settings can resolve the QB script errors.

  1. Press Windows + R and enter Control Panel to open it.
  2. Go to Programs and Features and click Turn Windows features on or off.
  3. Find Internet Explorer 11, uncheck the box, click OK, and restart your computer.
  4. After restarting, go back to the same menu, re-check the box for Internet Explorer 11, and click OK.
  5. Restart your PC one last time and open QuickBooks to check if the error has been fixed.

Solution 7. Clear SSL State Certificates

Sometimes, the old security connection between QuickBooks and the web server gets stuck. Clearing the SSL state refreshes this connection without deleting your browsing history.

  1. Open the Control Panel and click on Internet Options.
  2. Navigate to the Content tab at the top.
  3. Click the Clear SSL State button.
  4. You will receive a confirmation message saying “The SSL cache was successfully cleared.”
  5. Click OK to save the changes and restart QuickBooks.

The Bottom Line!

These effective solutions help you fix the QuickBooks script error easily and allow you to get your accounting back on track. By identifying the root causes and key symptoms of the error code 0, you can implement the right troubleshooting steps.

Whether the issue stems from outdated browser data or restrictive security settings, following this guide ensures a smooth and error-free workflow.

Frequently Asked Questions

  1. What is a script error in QuickBooks?

It is a browser-related issue where QuickBooks Desktop fails to load or execute a web page. It usually occurs due to outdated Windows Internet settings or conflicting browser files.

  1. How do I fix the QuickBooks script error code 0?

You can fix it by adding Intuit as a trusted site, clearing your browser cache, and disabling script debugging within your system’s Internet Options.

  1. Can I still use QuickBooks if the error isn’t fixed?

Yes, the software will still function, but the pop-up will continue to interrupt your workflow. If standard fixes don’t work, you can check your Windows Firewall or an outdated QuickBooks update.

  1. What causes the QuickBooks Script Error?

It is primarily caused by outdated Internet Explorer settings, corrupted browser cache, or security blocks that prevent QuickBooks from loading its internal web-based tools.

  1. Do I have to stop my work when a script error message pops up?

No, you don’t need to stop your work entirely. While the pop-up is an interruption, applying the right troubleshooting methods will resolve the glitch and allow you to resume your work smoothly.


What is QuickBooks Error 6000, 83 & How to Solve It Fast?

The QuickBooks Error 6000, 83 mainly occurs when QuickBooks tries to access the company file but faces a communication or permission issue. If you are currently dealing with a QuickBooks company file error 6000 83, you know how quickly it can disrupt your workflow.

This blog post helps you understand why this is happening and shows you exactly how to fix QuickBooks error 6000 83 smoothly.

What Causes QuickBooks Company File Error 6000-83?

QuickBooks Error code 6000, 83 usually occurs when the software cannot access the company file due to damaged files, incorrect file permissions, network disruptions, or hosting enabled on multiple workstations.

Here are the common causes of this fatal error code:

  1. Corrupted Company File: If your data or the shared folder is damaged, QuickBooks cannot read the file.
  2. Lack of Folder Permissions: If the user doesn’t have full control over the folder where the file is stored, then it shows access denied.
  3. Firewall Blocks: Your security software or Windows Firewall may be blocking the QuickBooks connection error 6000 83.
  4. Hosting Conflicts: If your multi-user hosting is mistakenly turned on for workstations instead of just the server, it creates a system clash.
  5. Invalid File Names: Using special characters or having a file name that is too long can trigger a QB error.
  6. Network Issues: Damaged .ND or .TLG files prevent QuickBooks from communicating properly over your network.

How to Fix QB Error 6000, 83 Based on Your Situation?

To solve this error efficiently, you need to choose the scenario below that matches what you were doing when the error appeared on your screen:

Scenario 1 – I was creating a backup.

If you are facing a QB file backup error 6000 83, it means there is a communication glitch with your server or a permissions issue.

  1. Close QuickBooks on your server.
  2. Open your C: Drive and create a new folder named QB Test.
  3. Save your backup file to this new folder on your local drive instead of the server.
  4. Restore the file from this folder. If it works, rename your old company file so you don’t use it by mistake and start using this new one.

Now, take a full backup of your company file. When QuickBooks asks where you want to save your backup file, save it to the folder you just created on your C: drive.

If you don’t see the error code, then use your backup as your main company file. If you still face the QuickBooks Enterprise error 6000 83, go to the server setup section.

Read More – QuickBooks Error 6000 80

Scenario 2 – I was Restoring My Company File

A common cause for QuickBooks Error code 6000, 83 during restoration is an incorrect filename.

Solution 1. Verify the Backup File Name

  1. Press the Windows Start button and type File Explorer to open it.
  2. Locate the open backup file folder.
  3. Right-click the File and choose Rename.
  4. Delete any symbols, special characters, or spaces that may trigger the error code.

If the error still persists, move to the next solution.

Solution 2. Use a Portable Company File (.QBM)

If your regular backup file (.QBB) isn’t working, then creating a Portable Company File is your best way. It is a smaller version of your data that doesn’t include letters, logos, or images. This makes it much easier to restore without triggering a QuickBooks Desktop Error 6000 83.

Step 1. Create the Portable File

  1. Open QuickBooks on the computer where your company file still works.
  2. Go to the File menu and select Create Backup.
  3. Choose Portable Company File and click Next.
  4. Give the File a simple name, no special characters, and save it to your desktop.

Step 2. Restore the Portable File

  1. Move that new File to the computer where you were having trouble.
  2. In QuickBooks, go to File and select Open or Restore Company.
  3. Choose Restore a portable file and click Next.
  4. Select your desktop file and follow the prompts to restore it.

Solution 3. Restore Your Backup from the Local Hard Drive

If you are still seeing QuickBooks error code 6000 83, to fix this, you can bypass the network entirely by moving the File to your own computer’s C: drive to restore it.

  1. Find your backup file on your server or network drive. Right-click it and select Copy.
  2. Go to This PC or My Computer, open your C: Drive, and paste the File there.
  3. Open QuickBooks and go to File> Open or Restore Company.
  4. To restore in QuickBooks, choose Restore a backup copy and click Next.
  5. When asked for the location, browse to your C: drive instead of the server.
  6. Once the File opens successfully on your local computer, the QuickBooks desktop error 6000 83 is fixed. You can then save a new backup and move it back to your server or original shared folder.

Scenario 3 – If Your Company File is on a Linux Server

Running QuickBooks Enterprise on a Linux server is great for performance, but it can make QuickBooks connection error 6000 83 a bit more technical to solve. Because Linux is case-sensitive and relies on specific network mapping, you need to ensure your Windows workstations know exactly how to connect to the Linux server.

Step 1. Configure the Linux Database Manager

  1. Open the Linux Database Server Manager on your server.
  2. Check the Initord.conf file to ensure the directory containing your company file is correctly listed and configured.
  3. Restart QuickBooks on your host computers to refresh the connection.

If the File still won’t open, move to the next step to fix the QuickBooks Error -6000, -83.

Step 2. Configure your Host File

Ping the server and get your server IP address:

  1. On a Windows computer, click Start, type CMD, and press Enter.
  2. Type ping (Name of your Linux Server) and hit Enter.
  3. Write down the IP Address and the Server Name that appear.

In the next step, you need to edit the host files. Ensure all the computers have the correct IP address and the Linux server name. You can start with the server where you see QuickBooks Error 6000, 83.

  1. First, quit QuickBooks from all the computers connected to your network.
  2. Go to the file menu and choose Quit QuickBooks Desktop.
  3. Afterward, click on the Windows Start menu and type File Explorer to open it.
  4. Choose My Computer from the navigation bar and open your C: drive, then open your Windows folder.
  5. Locate the System32 folder. Open the Drivers folder and then the ETC folder.
  6. Right-click the File called C:\Windows\System32\drivers\etc\hosts. Select Open with and then Notepad.
  7. Scroll to the bottom of the File and add the Linux server IP address to the end of the text.
  8. Once done, press the Tab key and add your Linux server name.
  9. Remember, Linux system files are case sensitive. Ensure you enter names with the correct case to avoid further issues.
  10. Go to File, click on Save, close Notepad, and try opening your company file again.

Hopefully, the above solution has helped you fix the error 6000 83 in QuickBooks without losing your business-sensitive data.

Final Thoughts!

Hopefully, this blog post will help you resolve the QuickBooks error 6000, 83 easily. By following the above-mentioned methods, you can easily access your company file and get back to your accounting tasks without further delay.

To keep your QuickBooks Desktop error-free, remember to keep your software updated, use simple filenames without special characters, and ensure only your server is set to host multi-user access.

Frequently Asked Questions

Question 1 – How to fix QuickBooks error 6000 83?

To fix this efficiently, you can run the tool hub or create a new portable file for accessing the company files.

Question 2 – What does QB Error code 6000, 83 mean?

QuickBooks can not open the company file because the File is corrupted, or the hosting is enabled on multiple workstations.

Question 3 – What causes QuickBooks error 6000 83 Windows 11?

It is caused by connectivity issues where QuickBooks cannot reach the company file, often due to improper hosting settings, damaged network data, or firewall restrictions.

Question 4 – How do I use the QuickBooks Tool Hub to fix this?

First, download and open the QuickBooks Tool Hub, select Company File Issues, and run the QuickBooks File Doctor to automatically diagnose and repair the file access issue.

Question 5 – What should I do if the error persists after trying standard fixes?

You must verify that your Windows user permissions allow full read or write access to the company file folder, or try restoring a backup of the company file to a new location. By doing that, you can fix the error 6000 83 in QuickBooks Desktop.

QuickBooks Error 1723: Rectifying Steps

Facing issues while installing or updating your QuickBooks application on Windows? The reason might be the internal damage or glitch in your Windows Installer that results in QuickBooks error 1723. Are you receiving this error as well? If yes, your screen is probably displaying the message read as, “Error 1723: There is a problem with this Windows installer package.” Windows Installer engine is an integrated function of Windows that allows users to install or update QuickBooks. However, due to the occurrence of this error, users fail to install, update, and uninstall their QuickBooks application.
Don’t worry! If the case is the same with you, too, follow this comprehensive guide to troubleshoot this problematic QuickBooks error 1723.
Need help from QuickBooks professionals while dealing with the QuickBooks installation error 1723? Contact us at +1-844-508-2335 and get assistance from our certified experts.

Noteworthy Signs to Notice for QuickBooks Error 1723

As discussed at the beginning, users cannot install or update their QuickBooks application due to the QuickBooks error 1723. So, it’s the first sign of the error, and that’s why it’s also recognized as a QuickBooks installation error. We have mentioned a few more symptoms that can help you identify the error.
  1. Other than the QuickBooks, you may be unable to install other applications on your Windows computer system.
  2. The message with error code 1723 appears on your screen during the installation, update, or uninstallation procedure.
  3. You can assume and sense this installation error 1723 in QuickBooks when your Windows starts responding slowly or performing poorly.
  4. While or before uninstalling the QuickBooks application, it stops responding or may crash.
  5. The unexpected or abrupt end of the applications installation procedure.

What Reasons Bring Users Face the QuickBooks Install Error 1723?

As already stated, the damaged Windows Installer and its services are the main reason for triggering QuickBooks install error 1723. But, a few more reasons are mentioned below that may cause this error. Let’s check:
  1. Corruption or slight damage in your System’s hard drive can cause you to encounter an error while installing the application.
  2. The unmatched QuickBooks configuration with system requirements is another reason for the installation errors in QuickBooks.
  3. Make sure you have properly installed the QuickBooks set-up files; else, the installation procedure may be interrupted.
  4. You may be unable to install, update, or uninstall the QuickBooks and other applications if you have improperly configured permissions for the temp folders.
  5. Malicious infections from any virus are also responsible for interrupting users while installing the QuickBooks application.
  6. Ensure you have logged in to your user account with the proper Windows administrative rights and correct credentials.
  7. Often, due to an unstable or slow network, the Windows installer misses some crucial QuickBooks files; at such times, users can face the QuickBooks install error 1723.
  8. If your Windows is installing some other application programs in the background and you’re trying to install QuickBooks simultaneously, you may meet the error.
  9. Another major reason for QuickBooks installation errors is the Outdated Windows Operating System.

How to Quickly Troubleshoot Error 1723 QuickBooks?

Undertake the troubleshooting techniques mentioned below to get rid of the QuickBooks installation error 1723. But, create a backup of your company data file to save your crucial data from potential loss and threats during the troubleshooting processes.

1. Allot Required Administrative Rights to the Windows User Account

If you are working on a Windows user account without the required administrative rights, you won’t be able to install or update QuickBooks due to error 1723 successfully. So, first, assign these rights with the steps as follows:
  1. First, navigate to the Windows Start button and continue to click the Control Panel.
  2. In the Control Panel, you will see the User Account option; double-click the same to select the account without administrative rights.
  3. In this step, you need to click the Change the Account type option followed by selecting the Computer Administrative option.
  4. Now, hit the Change Account type alternative and continue to restart your computer.
  5. After this, sign in to your account and try to install or update your QuickBooks application. If you’re still getting the error 1723 text, “INSTALLMESSAGE_ERROR Message: Error 1723,” try the next method.

2. Let System File Checker Tool Help You

The system File checker tool is effective for scanning and fixing general system file errors. Thus, you can use this tool to rectify QuickBooks error 1723, which may occur due to system file issues. Use the tool with the steps as follows:
  1. First, move your cursor to the Start menu and enter “Command Prompt” in the Search Programs and Files bar.
  2. Make sure not to click the Command Prompt window after getting the results for the same. But, give a right-click to this Window and continue to run it as Administrator.
  3. Here, you’ll be asked to enter the administrator credentials. Enter the correct one and continue to type SFC/Sacnnow after getting the Command Prompt Window.
  4. Tap the Enter button, and the tool will diagnose and fix the system file issues affecting your QuickBooks installation process.

3. Permit Windows Temp File Folder with Full Control Access

Installing the QuickBooks application requires some crucial files that are available in the Windows Temp folder. In case you don’t have the required permission to access these temp files, you may meet error 1723 QuickBooks. Allow access by:
  1. First, move to your Windows Desktop Start button and navigate to the Search Programs and Files space. Here, you need to type %temp% and continue to right-click the Temp file folder.
  2. After this, move to the Security option, and you will see an Edit option. Click this option and continue.
  3. Move to the Permissions for System tab; under this tab, you are required to click the Allow All option to tick all the checkboxes.
  4. In this step, click the Apply button followed by the OK option on the displayed Temp properties window. It will apply and save all the changes you have done above.
Still, facing the error and unable to continue the installation process? Let’s try some more troubleshooting methods.

4. Take Help from QuickBooks Install Diagnostic Tool

The QuickBooks Install Diagnostic Tool is one of the effective tools to solve installation errors, such as QuickBooks install error 1723. Get the tool from the QuickBooks Tool Hub and run it with the help of the steps mentioned below:
  1. First of all, get the QuickBooks Tool Hub Download from the official Intuit website and start running the application installer file with the .exe extension. You will get this file from the browser’s Downloads section.
  2. Now, your screen will display some instructions; follow them to complete the QuickBooks Tool Hub installation.
  3. In this step, start running the Tool Hub and click the Program Installation Issues tab. Here, you need to choose the QuickBooks Install Diagnostic Tool.
  4. Start running this tool and wait for around 20 minutes until the repair process ends.
  5. After the issues are repaired, now restart your QuickBooks application and check the error status. If it’s still active, don’t panic; try the next technique.

5. Get the Latest Windows Updates

As noted earlier, if your Windows is missing the latest updates, it will surely bring hurdles in your QuickBooks installation process resulting in QuickBooks error 1723. Therefore, follow the given steps to update your Windows.
  1. Initiate this process by opening your System’s settings and finding the option to update your Windows.
  2. When you get the Windows Update option, click it and look for the available updates.
  3. Press Yes, to begin with, the download and installation process of Windows updates. But, at this time, you need to ensure that no other applications are running in the background.
  4. After this, click the Finish button to end the installation process of the updates, and your Windows is updated.

Summing Up..!

We assume that the techniques given above to troubleshoot the QuickBooks error 1723 have helped you greatly. If it’s not so and you need our professional help, contact us at +1-844-269-7070 You can also reach out to us via our QuickBooks Enterprise Support Number system. Our certified QuickBooks experts will gu,ide and help you professionally with instant troubleshooting solutions.

Troubleshoot QuickBooks Error 15240 With Premium Solutions

What if, when you’re seamlessly working on your QuickBooks accounting application and some technical bugs or errors interrupt you? Distressing, right? The same problem occurs with QuickBooks Error 15240 when users fail to update their QuickBooks desktop or payroll software. When users encounter the error, they get an error message reading, “QuickBooks error 15240: HRESULT XXXXX the QuickBooks updated did not complete successfully” or “QuickBooks error 15240: HRESULT XXXXX the payroll update did not complete successfully.” Are you facing this issue too? If yes, continue reading this blog and find out the solutions.

Tired of facing desktop and payroll update issues in your QuickBooks? Let our certified QuickBooks experts help you professionally. Contact our team at +1-844-269-7070 and continue to work worry-freely.

What Signs Users May Notice With QuickBooks Update Error 15240?

While users are dealing with the QuickBooks update error 15240, they probably notice the following signs:

  1. The foremost sign of noticing the error is the error message itself.
  2. As discussed above, users fail to download the latest updates of their QuickBooks Desktop or payroll application.
  3. The sluggish or dull performance of your Windows is another sign of the update error 15240 in your QuickBooks application.
  4. You won’t be able to work smoothly anymore on the payroll.
  5. With the error present, your mouse and keyboard won’t respond properly.
  6. Another sign of noticing this update error code 15240 is the frequent crash and freeze of your computer while opening it.

QuickBooks Desktop Update Error 15240: Why Does It Occur?

The following factors can be considered as the primary causes of the QuickBooks desktop update error 15240.

  1. Poor installation setup or incomplete installation of the QuickBooks application can trigger update errors.
  2. In case your Windows is facing registry issues, it may come across the QuickBooks error code 15240.
  3. You may receive the QuickBooks update error message 15240 when your computer system is set with incorrect date and time settings.
  4. The incorrect Internet Explorer settings and configuration is another reason for the update error.
  5. Make sure that you’re working with an updated QuickBooks Desktop version; else, you may meet problems while updating your application.
  6. In case your last QuickBooks update has been done incorrectly or incompletely, it may bring issues in your further updates.
  7. The accidental deletion of QuickBooks files which are essential while downloading the updates, can also be a reason for the update error.
  8. You may face errors while downloading the QuickBooks and payroll updates if the download link is incorrect, invalid, or wrong.
  9. An unstable or weak internet connection can prominently prevent you from successfully updating your QuickBooks Desktop or payroll application.

Points to Remember Before Troubleshooting QuickBooks Error 15240

Before you start troubleshooting the QuickBooks update error 15240, we suggest you take a look at the following considerations. With this, the troubleshooting procedure will become easier to perform.

  1. Your computer must display the correct date and time at the bottom-left corner of your screen.
  2. Sign in with your user account having admin credentials to download the QuickBooks desktop and payroll updates successfully.
  3. You must have installed the latest version of your Windows and QuickBooks desktop application on your system.
  4. It’s recommended to disable the installed Firewall or Antivirus application on your system while downloading the payroll updates.

Troubleshooting Methods to Resolve QuickBooks Update Error 15240

Carefully walk through this section to find out the most effective and easiest troubleshooting methods to resolve QuickBooks update error 15240.

1. Allow QuickBooks Installation Folder with Required Permission Access

When the software installation folder lacks required permission access, you may fail to download the QuickBooks desktop and payroll updates.

  1. First of all, close the QuickBooks application and continue to navigate to the Windows File Manager to open.
  2. After this, go to the C:\Program Files\ folder, and here, you need to right-click the Intuit folder.
  3. Now, click the Properties option and select the Advanced tab, then verify whether the User Group is set as Owner.
  4. In this step, click the Advanced Security Settings option. Here, you need to click the Change alternative, which is available at the left of the Owners section.
  5. Go to the Enter the object name to select an option and continue typing the Users name. After this, hit the Check Names tab and click the OK button.
  6. Continue to the step and tick the Replace owner on sub containers and objects box, then hit the Apply and OK buttons.
  7. After this, navigate to the Permissions section, select the Users option, and choose the Full Control option.
  8. End the entire procedure by clicking the Apply and OK buttons, respectively, to save all the changes.

If the error is still troubling you while downloading the updates, give permission access to the following folders:

  • C : \Users\ Your User Name\ AppData\ Local\ Intuit
  • C :\ ProgramData\ Intuit
  • C :\Program Files \Common Files\ Intuit
  • 64-bit users C :\ Program Files (x86)\ Common Files \Intuit

Read also- QuickBooks Tool Hub Download

2. Check and Correct the Internet Explorer Configuration

In case the above method hasn’t figured out the issue of QuickBooks Desktop update error 15240, try to check the internet explorer settings. If the configuration is incorrect, follow these steps:

  1. Begin this procedure by first opening your Internet Explorer and navigating to the Gear icon.
  2. Now, you need to select the Internet options tab and move to the advanced tab. Under this tab, checkmark the Use SSL 2.0 and Use SSL 3.0.
  3. After checking these boxes, click the Apply button and continue to hit the OK button. Check the error status, and if it still exists, continue to perform the next method.

3. Use QuickBooks Clean Install Tool to Perform QuickBooks Clean Installation

The tool is effective enough to troubleshoot common errors, including the QuickBooks Desktop update error 15240. So, let’s use the tool and perform the clean installation of the QuickBooks software.

  1. First, you need to navigate to your Windows Start menu and click on the Control Panel tab.
  2. Under the Control Panel tab, select the Uninstall a program alternative and further click the QuickBooks application to select the Uninstall/changes the application option.
  3. After this, you are required to choose the uninstall option and continue to follow the on-screen instructions to remove the QuickBooks application from your computer system.
  4. In this step, download and install the QuickBooks clean install tool by navigating the official Intuit website.
  5. Once you have installed the tool, accept the required terms and conditions by clicking the I accept to begin running the tool.
  6. Here, pick the correct QuickBooks application version, click the Continue button, and hit the OK button.
  7. Now, reinstall the QuickBooks application by clicking the Install QuickBooks option.

4. Fix the Incorrect Date and Time Settings Issues

As noted earlier, the incorrect date and time settings may not allow you to download the latest QuickBooks Desktop and payroll updates leading to the QuickBooks update error 15240. So, change the settings by the following method:

  1. First, you need to tap the time display on your computer screen and continue to hit the Change date and time settings alternative.
  2. In the second step, you have to correct the date and time by applying a few changes in the settings.
  3. Click the Apply button and select the OK tab to end the procedure successfully.

Still, can’t we eliminate the error? Let’s try running QuickBooks with administrator rights.

5. Start Running your QuickBooks Application With Admin Rights ;

It’s quite possible to meet the error while updating your QuickBooks Desktop or payroll if you are not logged in with a user account having admin rights. If the case is the same with you, go with the steps given below:

  1. First of all, click the QuickBooks application icon and continue to open it.
  2. Here, you are required to select the option saying Run as Administrator.
  3. In the next step, open the specific Properties and verify the compatibility for all the user accounts of QuickBooks.

In a Nutshell..!

So, now we hope these solutions have helped you in solving the stubborn QuickBooks error 15240. However, if it’s not so, the error must be associated with other glitches. Let our QuickBooks Enterprise Support Number help you find the root cause and solve the error. You can call our professionals at +1-844-269-7070 or get in touch with us via Live Chat Support.

Let’s Fix QuickBooks Error 80029c4a (Error Loading Type Library/DLL)

QuickBooks is undoubtedly an excellent Windows software program, but users still complain about certain errors, and QuickBooks error 80029c4a is one of them. Does your application also suffer from the same error? If yes, this complete blog is just prepared for you. Continue reading, and you will learn about all the prominent reasons and troubleshooting methods to eliminate this error.

Contact us at +1-844-269-7070 and talk to our QuickBooks experts regarding the error. Our team will help you rectify the issue professionally. 

QuickBooks Error 80029c4a: What’s All About?

The QuickBooks error 80029c4a is a frustrating error that occurs out of nowhere while opening the QuickBooks Desktop application on Windows. You may encounter the error along with a warning message read as, “Problem: There was an unexpected Error reported when trying to run QuickBooks with company file.” When you click the OK button in this message box, you will get another message: “QuickBooks couldn’t load a system component. Restarting your computer might solve the problem. Error type: 80029c4a – Can’t load dynamic link library (DLL).”

Read Also- QuickBooks File Doctor Tool

Signs to Recognize Error Code 80029c4a in QuickBooks Desktop

After the attack of QuickBooks error code 80029c4a on your application, you may notice the following signs:

  • Dull and sluggish performance of Windows and related programs
  • The sudden crash of an active Windows program can also be considered a sign of the error code 80029c4a.
  • Time and again, you will notice the freezing of your computer system.
  • Repeated flashing of error message on your screen when you open your QuickBooks application.
  • Slow or no response from Windows after mouse clicks and keyboard commands.

What Factors are Responsible for QuickBooks Error 80029c4a?

Take a look at the following factors and learn why you face QuickBooks error code 80029c4a while opening the QuickBooks application on Windows:

  • The missing, corrupted, or damaged QuickBooks desktop system files can cause you to encounter the error code 80029c4a.
  • Corrupted or incomplete QuickBooks software installation is also a reason for facing errors while opening the QuickBooks software.
  • If the DLL files are missing, you may fail to open your QuickBooks application and face an error.
  • Another reason for receiving QuickBooks error 80029c4a is issues with your QuickBooks components. When these components don’t start, an error occurs.
  • Perhaps the Windows registry entry might be corrupted after recent QuickBooks software changes. This issue may prevent you from launching the QuickBooks application.
  • A damaged Windows File System from any malicious virus or malware is another causing factor of the error code 80029c4a.
  • In case your system file is incorrectly marked or infected by the Antivirus defender, you may meet the QuickBooks error 80029c4a Windows 10.

Read Also- QuickBooks Tool Hub Download

How To Fix QuickBooks Error 80029c4a? Stepwise Guide

This section will teach you how to fix QuickBooks error 80029c4a with quick and tested troubleshooting strategies. Carefully read the following steps and perform the stepwise directions to eliminate the problem.

1. Fix Problems with QuickBooks Desktop on Windows

Unquestionably, you may face issues with error code 80029c4a due to the corrupted QuickBooks application. Thus, start performing the given steps and repair your application.

  • Initiate this troubleshooting technique by first pressing and holding the Windows Start button on your keyboard.
  • You will get a window where you need to tap the R button from your keyboard. It will bring the Run Window.
  • In the Run Window text bar, you must enter the Control Panel by tapping the Enter key.
  • Once you get the Control Panel results, click the Programs and Features option.
  • Here, you will get a list of programs installed on your computer. Select the QuickBooks application from this list to choose the Uninstall/Change option.
  • Now, hit the Next button, followed by choosing the Repair option. After this, some instructions will appear on your screen, and you need to follow them to end the process successfully.
  • In the end, restart your Windows and try to open your QuickBooks application again. If you still face issues, implement the next technique.

2. Take Help from Reboot.bat File

Running the Reboot.bat file can be an effective approach to avoid error code 80029c4a in QuickBooks Desktop. How? Since the Reboot.bat file is a batch file that helps refresh all the essential QuickBooks files.

  • To start this troubleshooting procedure, you need first to close your QuickBooks application and move straight to the folder where the Reboot.bat file is located.
  • After this, right-click the QuickBooks application and continue to select the Properties option.
  • In the next step, click the Open File Location option once, and right-click the Reboot.bat file to select the Run as administrator option from the context menu.
  • After choosing to run the Reboot.bat file as Windows administrator, the batch file will automatically start registering all the QuickBooks files from the Windows directory.
  • Now, restart your computer, try to open your QuickBooks desktop application, and check the error status.

3. Verify Antivirus Program for Files Being Quarantined

Antivirus programs move the applications or services that are identified as threats to your Windows security to the Quarantine folder. It may happen with the QuickBooks application as well, which eventually results in issues while opening the QuickBooks application. Check the following instructions to verify the quarantined folder and remove the error.

  • First, move to the Antivirus dashboard and continue navigating to the Antivirus Quarantine folder.
  • In this folder, you need to search for the quarantined files of the QuickBooks installation directory.
  • When you find these QuickBooks files, delete them from the quarantine folder.
  • In the final step, after the deletion of the files, you are required to restart your QuickBooks Desktop application.
  • Check if you are still facing QuickBooks error 80029c4a Windows 10 while opening the application or not. If it’s so, move to the next solution.

4. Implement the Windows System File Checker Scan

This approach of performing the Windows System File Checker scan is another effective way of rectifying QuickBooks error 80029c4a. To implement this, you need to begin with the steps mentioned below:

  • First of all, you need to click the Windows Start button and navigate straight to the Search Programs and Files bar.
  • In this search bar, you are required to type Command followed by simultaneously pressing the CTRL + Shift keys.
  • Hit the Enter button on your keyboard and click the YES option after you get the permission dialogue box on the screen.
  • In the next step, type SFC/Scan now in the given area and tap the Enter button on your keyboard.
  • After this, the System File Checker will automatically start scanning the issue. Here, you need to wait till the scan is successfully over.
  • You will get the notification of the completion on your screen. Once notified, start performing the instructions on your screen to resolve the error completely.

5. Implement the Procedure of QuickBooks Clean Installation

When nothing works, the clean installation of your QuickBooks software can help you greatly troubleshoot the QuickBooks error code 80029c4a. In case you have also failed to resolve the error using the above solutions, try this clean installation method as follows:

  • Start this method carefully by first collecting all the QuickBooks product information.
  • In the next step, you are required to download the installer of any respective QuickBooks version.
  • Now, get the QuickBooks product License number from the original packaging of QuickBooks. You can also find this number in the email of purchase confirmation.
  • Once you get the required information, make sure to note down the QuickBooks product year and version.
  • After this, the next step is to uninstall the QuickBooks application from your computer system successfully.
  • Navigate to the Windows Start menu and search for the Control Panel option in the search bar.
  • After getting the results of the Control Panel, click it to open, and select the Programs and Features option.
  • Here, you will get the list of installed programs on your computer. You must hit the QuickBooks application version from this list to further select the Uninstall/Change alternative.
  • Click the Remove option to delete the QuickBooks application, then hit the Next button to perform according to the prompts on your screen.
  • Once you have hassle-freely uninstalled the QuickBooks application, now, reinstall the application, and you are done.

The Final Thoughts..!

Hopefully, the troubleshooting techniques mentioned above have performed up to the mark and resolved the issue of QuickBooks error 80029c4a. In case it’s not so, reach out to our QuickBooks enterprise support  via Live Chat Support. Our team will serve you professionally in this annoying error situation.

QuickBooks Tool Hub: Complete Download & Installation Guide

If you use QuickBooks regularly, chances are you’ve run into occasional technical issues—whether you’re a beginner or an experienced user. To simplify troubleshooting, Intuit has introduced the QuickBooks Tool Hub, an all-in-one solution designed to help users quickly resolve common problems.

In this blog post, we’ll walk you through everything you need to know about the latest QuickBooks Tool Hub version 1.6.0.8—from how to download and install it, to exploring its standout features, available tools, and various functional tabs. Keep reading for a complete guide to getting the most out of this essential utility.

What’s New in QuickBooks Tool Hub Version 1.6.0.8?

Undoubtedly, QuickBooks has been recognized as one of the effective and cutting-edge software for the accounting professionals. But, it’s a technology and you never know when an unwanted technical glitch happens and hamper your ongoing workflow and overall productivity. For such instances, the latest QuickBooks Tool Hub download 1.6.0.8 can help you.

This free utility can help users like you fixing the common QuickBooks issues such as installation errors, login issues, company file problems, network and connection glitches, and much more. In addition, the Tool Hub is an exclusive compilation of the trendsetting tools and services, helping the daily users address all the possible software issues.

Before the invention of the Tool Hub 1.6.0.8, the daily users used to download multiple tools for specific QuickBooks errors or technical issues. However, now the availability of the QuickBooks Tool Hub has made everything easy for the users by providing the direct access to all the required tools or services.

System Requirements to Download and Install QuickBooks Tool Hub

Before download and install QuickBooks Tool Hub, ensure the below-given minimum requirements on your computer system. The requirements given below are essential, allowing you to easily perform the Tool Hub download and installation. Have a quick look:

  • A reliable and strong internet connection on your computer system. Ensure high-speed internet access with at least a connection speed of 56 Kbps (1 Mbps recommended).
  • Microsoft components such as Visual C++ redistributable package and .NET Framework are mandatory for an error-free installation of the Tool Hub on your Windows system.
  • You need to ensure that your system has the recommended 8 GB of RAM for a 64-bit system. Also, we suggest you get 16 GB of RAM for extra program files.
  • A 2.4 GHz minimum processor is also one of the basic requirements for daily users.
  • Your screen display must be optimized for 1280×1024 resolution or higher, ensuring up to two extended monitors.

Download & Installation of the QuickBooks Tool Hub 1.6.0.8 Version

After ensuring the system requirements given above, now let’s begin downloading and installing the QuickBooks Tool Hub 1.6.0.8 version. You must undertake the instructions given below to perform the easy installation.

Step 1 – Download the Setup file of the QuickBooks Tool Hub

  • To begin this method, you must make sure that no tabs or windows are running in the background. If so, close them all, and restart your computer system.
  • Next, visit the official Intuit website and then move to the QuickBooks product download page.
  • Afterward, click the link to download the QuickBooks Tool Hub setup file. Keep waiting till the file successfully gets downloaded, which will take a few minutes.
  • Once the file gets downloaded, now save it on your computer’s desktop location, from where you can easily access this downloaded file. This file is QuickBooksToolHub.exe.
  • Done till here? Now, close all the tabs, and move to the next step to begin the installation of the QuickBooks Tool Hub 1.6.0.8.

Step 2 – Installing the QuickBooks Tool Hub Latest Version

  • To begin installing the Tool Hub, you first need to move to your computer’s desktop location, where you’ve saved the setup QuickBooksToolHub.exe file.
  • Once you open this file, you will find some on-screen prompts to perform. Carefully continue to perform these instructions, and then click the Next button.
  • By this, you will get a license agreement with all the terms & conditions on your screen. You must carefully read and then agree to these terms & conditions by selecting the respective box. Also, to accept the license agreement, choose the Yes button.
  • Now, you will be asked to choose the location within your computer to keep the QuickBooks Tool Hub latest version.
  • Afterward, begin the installation of the Tool Hub by choosing the Install button. By this, the installation will begin, which will take a few moments.
  • Now, wait accordingly till the installation successfully ends. Once it’s over, you must click the Finish alternative.
  • Next, close all the open tabs and running windows on your system, and then restart your computer.

What are the Different Tabs Available within the QuickBooks Tool Hub?

Once you successfully complete the installation of the QuickBooks Tool Hub 2025, open the Tool Hub and start exploring it. You will find the tabs given below:

Home

The first tab is particularly designed to help users get a complete information about all the tools, services, utilities, and features available within the Tool Hub. These brief details and information helps QuickBooks users easily move into the QuickBooks Tool Hub. By this, users also get an idea about when and how to use the different tools.

QuickBooks-Tool-Hub

Company File Issues

While managing QuickBooks operations, users encounter a number of issues such as the QuickBooks company file errors, including the 6000 series errors. These issues are the result of data damage, corruption, discrepancies, and sometimes the file network issues as well. At such times, users must move to the Company File Issues tab, from where they can access the QuickBooks File Doctor Tool and Quick Fix My File.

fix-company-file-issue

These tools and utilities are easy to use to address all sorts of company or file network issues within the QuickBooks application.

Network Issues Tab

Another tab is for addressing network errors in the system. These issues also commonly occur when there’s a problem with the internet connection or network configuration, preventing the QuickBooks software from connecting with the company file. Thus, to help daily users, the QuickBooks tool hub free download has a dedicated tab, which is the Network Issues tab.

Fix-Network-Issues

Also, when a user encounters the H-series multi-user errors, this tab and its services, such as the QuickBooks Database Server Manager, can help. By ensuring this active service, users can fix all the network-related or multi-user errors on the QuickBooks software.

Program Problems

As mentioned above, QuickBooks is a technical program, and anyone using it can encounter errors. Often, the program itself becomes a problem and can bring a number of technical issues. Thus, to help users in such a situation, the QuickBooks Tool Hub 2025 has included the Program Problems tab. Certainly, these issues can occur anytime, but with the help of the tools available within this tab, including Quick Fix My Program, QuickBooks Program Diagnostic Tool, and QuickBooks Print & PDF repair tool, users can address the respective problems.

fix-my-program-problems

Installation Issues

The next tab is specifically for the Installation Issues. There are times when a user faces issues while installing, updating, or running the QuickBooks software. Installation issues such as error 1603, error code 80070057, or error 1904 can arrive at users due to corrupt or missing installation files. Update problems can occur due to missing system components, such as the Microsoft .NET framework, or insufficient permissions of the QuickBooks installer file.

fix-my-installation-issues

But, whenever a user encounter such update or installation errors, they can easily access the Installation tab of the QuickBooks tool hub 2025. From here, they can utilize the QuickBooks Install Diagnostic Tool available in the tab, helping them effortlessly fix all the respective installation and update errors.

Password Reset

It’s a common tendency among software users to forget their passwords or log in credentials. Certainly, QuickBooks users also often forget their admin or account passwords on QuickBooks, resulting in further login errors. Do you also find yourself in such a situation? If so, just opt for the QuickBooks tool hub download free and install it on your system.

reset-my-password

Within the tool hub, you will find the Password Reset tab. Herein, you must consider the given prompts, and continue to address the respective login issues.

Help & Support

Following the Password Reset tab, the next one is the Help & Support tab. A majority of QuickBooks users prefer asking for professional help and support when it comes to address the QuickBooks software-related errors. This component of the Tool Hub QuickBooks is effective and functional for those who need immediate support from the QuickBooks IT team.

Help-Support

Within this tab, users have choices from browsing the website, messaging us, and a smart-look session, making it easier for them to get customized QuickBooks assistance.

Advanced Tools

This tab of Advanced Tools with the QuickBooks Tool Hub for Windows 11 and 10 is for the users who fail to run the tools and services mentioned above. It’s an excellent resource with a number of advanced tools and services that can help you address QuickBooks crashing errors and company file issues of 6000-series errors. Have a look at the utilities given below that you can access within this tab.

Advanced-Tools
  • About this PC – Here, you can get information related to your device, including memory, configurations, documents, and more.
  • Windows Update – Access this option if you need to know about the latest system updates.
  • Download QuickBooks Desktop – To directly download the QuickBooks Desktop on your computer, you can use this option.
  • Internet Properties – To fix the settings related to the Internet Configuration, you must access this option.
  • Open Microsoft Troubleshooter—This tool could be effective for enabling rapid error configuration.
  • Task Manager – You can access this QuickBooks task manager to learn about the multiple processes or services running for your QuickBooks Desktop software.
  • Launch Windows Explorer—Users can also access this Windows Explorer option with the help of the tool hub QuickBooks and continue to perform the respective operations.
  • Repair Microsoft Office – There are possible QuickBooks errors caused by the issues related to Microsoft Office. By this, users can easily repair the compatibility problems of the MS Office.
  • SFC/Scannow – Sometimes, there are issues related to the system files that might trigger QuickBooks-related errors. To fix such system file glitches, you must access and run this SFC/Scannow feature.
  • Windows Advanced Firewall – The misconfiguration of the Windows Firewall settings is one of the significant causes of a number of QuickBooks errors. Thus, by accessing this feature of the QuickBooks Desktop Tool Hub 2025, you can fix such errors.

Common QuickBooks Issues Resolved by Tool Hub 1.6.0.8

Certainly, daily QuickBooks users can encounter a number of errors while using the software. As briefed above, these issues could be related to installation, QuickBooks updates, company files, printing, login, payroll, and many more. For your better insights, we have prepared a table given below:


QB Crashing errors

Company file issues

QuickBooks Error 80070057

Error 1706: No valid source could be found when opening Point of Sale

QuickBooks Error 6190, 816

QuickBooks crashing problems

Error: Unable to start the “IntuitUpdateService” Error: The service did not respond to the start or control request in a timely fashion

PDF and printing blunders

QuickBooks Error 3371 Status Code 11118

QuickBooks Error H202

QuickBooks Payroll Error 2002

QuickBooks Payroll Error 30159

Error 1642: Error installing Microsoft .NET. Could not verify the digital signature of file %s.

Error 1304. Error writing to file Intuit.Spc.Esd.Client.BusinessLogic.dll

QuickBooks Error 6209, 0

H series errors, including QuickBooks error H202, H303, and H505, and Quickbooks error H101.

Microsoft .NET Framework Errors

QuickBooks Error Code 6150

QuickBooks Error 6189, 816

PDF and printing blunders

Top Benefits of Downloading QuickBooks Tool Hub in 2025

As briefed above, the excellent QuickBooks Tool Hub helps daily users address and fix general software errors through its impressive tools and features. Now, let’s have a look at the below-given benefits to understand why it’s good to go for QuickBooks tool hub download 2025 and installation:

Easy to Access & Use

Undoubtedly yes! QuickBooks users can easily download and install the Tool Hub. Once it’s downloaded, users can also easily access it, and use the given tools plus services to address the respective QuickBooks issues.

It’s a Free QuickBooks Utility

The QuickBooks Tool Hub is a free utility available on the official Intuit website. Users can download and use it at any time. Along with the subscription to the QuickBooks Desktop software, users can access the Tool Hub with no extra costs.

Fix a Variety of Errors

QuickBooks users can encounter various technical errors while using the software. However, if you have downloaded and installed the QuickBooks Desktop tool hub, it can help you fix various errors. Within this Tool Hub, users can access multiple tools and services to troubleshoot the errors accordingly.

How to Download and Use the QuickBooks File Doctor Tool?

As discussed above, the QuickBooks File Doctor tool easily helps users fix the general company file and network issues in QuickBooks. Now, let’s learn how to access and run this tool. Simply use the prompts given below:

  • The very first step is to perform the download and installation procedure of QuickBooks Tool Hub 2025 on your computer, about which we have provided the steps above.
  • Next, after installing the Tool Hub, you must restart your Windows system and continue to double-click the icon of the Tool Hub.
  • Once it opens, directly move to the left-side panel and click the Company file issues tab. Within this tab, you will find the QuickBooks File Doctor Tool.
  • Now, double-click the tool to run it, and provide the admin credentials to run the tool. Following this, you will be asked to upload the company file having data or network issues.
  • By this, the tool will begin scanning and repairing the company file errors or network issues. Once done, now click the Finish option, and it’s done.
  • Finally, restart your computer and continue performing your respective QuickBooks company file operations.

Where to Find QuickBooks Install Diagnostic Tool & How to Run it?

Sometimes, the installation or update of the QuickBooks Desktop software becomes a challenge, and the reason is issues like QuickBooks error 1327, error 1712 QuickBooks, and many more. At such times, the QuickBooks Tool Hub download again plays a vital role. The available QuickBooks Install Diagnostic Tool can effectively help users:

  • Make sure your internet connection is steady and running at a good speed. Also, ensure that no other Windows application or related process is open in the background.
  • Once you confirm all these aspects, refresh your desktop and double-click the Tool Hub icon.
  • Afterward, move to the given drop-down menu in the left-side of the Tool Hub, and then choose the Installation Issues tab.
  • Now, within this tab, you can easily access the QuickBooks Install Diagnostic Tool. Click this tool to run, and it will start running automatically.
  • The tool will take around 20 minutes to fix the QuickBooks installation issues. Sometimes, it may take longer than 20 minutes, which is based on your system’s performance and the internet speed.
  • Lastly, once the complete process ends, choose the Finish tab, and close all the open windows. Following this, restart your system, and begin with your respective QuickBooks installation or update process.

How to Fix the Blocked QuickBooksToolHub.exe Download File?

Certainly, this type of issue might arrive to the users. Users may receive an error message on their computer screens, indicating that the QuickBooksToolHub.exe has been blocked. The reason behind this issue is the Windows Firewall settings, which blocks QuickBooks-related services to protect your system from any possible harm.

Well, in such cases, users like you must immediately use the prompts below:

  • When you receive the notification that QuickBooksToolHub.exe has been blocked, you may also get a message reading, “Microsoft Defender SmartScreen prevented an unrecognized app from starting. Running this app might put your PC at risk. More info
  • So, you just need to click the “More info” tab. Following this, hit the run away alternative to easily install the Tool Hub QuickBooks program.
  • Now, this download procedure will take a while. Once the download completes, perform the installation method with the help of the prompts given above.

The Bottom Line!

So, that’s the QuickBooks Tool Hub download in a nutshell. No matter how excellent the QuickBooks program is, technical errors and glitches can happen anytime. Users might find themselves in a panic situation at such times. Fortunately, the easy download and installation of the Tool Hub can save users from such terrific situations. If you’re also looking forward to downloading the Tool Hub, we suggest you use the above method. Carefully install this latest 1.6.0.8 version of the QB Tool Hub, and for professional help, connect with our team at +1-844-269-7070.

QuickBooks File Doctor – Fix Company File & Network Errors Fast

Intuit’s QuickBooks File Doctor is a powerful utility designed to fix common issues related to company file data damage and network errors in QuickBooks. It is especially helpful in resolving the notorious 6000 series errors that often occur when running QuickBooks in multi-user mode. This tool combines the functionalities of both the Network Diagnostic Tool and the Company File Diagnostic Tool, making it a comprehensive solution for troubleshooting.

If you’re looking for a step-by-step guide on how to use the QuickBooks File Doctor Tool effectively, this post has you covered. Keep reading to access all the essential information needed to run the tool and resolve QuickBooks errors with ease.

Top Issues Resolved by the QuickBooks File Doctor

QuickBooks File Doctor is a wonderful tool that is utilized to deal with numerous accounting errors. Here is the list of errors you can easily tackle using this tool.

  1. It helps to eliminate the 6000 series of errors such as Quickbooks Error 6150, Error 6000 82, 6000 305, 6000 301, etc.
  2. Also, it helps in troubleshooting multi-user mode errors like QuickBooks Error H202, H505, H303, etc.
  3. Damaged Windows Registry errors
  4. Data corruption errors
  5. Issues related to installation
  6. Network-Related Problems
  7. Facing issues if the user has a blank or missing Customer or Vendor List in QuickBooks.
  8. Corrupted or damaged company files.
  9. Malware attack hard drive
  10. QuickBooks Update Error Codes
  11. Multi-User mode firewall errors.

What are the different types of QuickBooks File Doctor?

There are two different types of QuickBooks File Doctor which are as follows:

  1. In Built-Version:-

    The stand-alone version of the QuickBooks File Doctor Tool is mainly. Moreover, it only comes built-in with the QuickBooks Desktop 2016 or the later versions. Therefore, keeping your QuickBooks application to the latest release has been suggested.
  2. Stand-Alone Version:-

    It works best with the QuickBooks File Doctor 2015 edition and is mainly utilized for hosting servers, connectivity, and network-related issues. But the user can only access this version if they have activated the QuickBooks Database Server Manager.

Requirements to Use the QuickBooks Tool Hub File Doctor

Before using the QuickBooks File Doctor Tool, it is necessary that you must know a few things.

  1. The users must have a proper administrator to use the QuickBooks File Doctor Tool.
  2. Verify that you have installed the single version of QuickBooks on your computer device.
  3. Only Windows users can access the QuickBooks Desktop File Doctor.
  4. Check that you are linked with a stable and high-speed internet network connection.
  5. Make sure that you have upgraded QuickBooks to the newly launched version.
  6. Above all of this, you must require a certain file size limit which is 1.5 GB to install the tool properly.

How to Easily Download QuickBooks Desktop File Doctor

Before you download QuickBooks File Doctor on your device, getting the QuickBooks Tool Hub is a must. For this, you must go through the instructions given below closely.

1. Download and Install the Latest Version of QuickBooks Tool Hub

The QuickBooks Tool Hub is a one-stop solution that comprises of different tools to fix accounting issues.

  1. Begin the process by downloading the recently launched version of the QuickBooks Tool Hub (1.6.0.8).
  2. After this, save the downloaded file to an easily accessible location. You can either store it in your Downloads folder or on your Windows Desktop.
  3. Note: if you already have the QuickBooks Tool Hub installed on your device, then verify which version you are accessing. For this, go to the Home tab, and you will get the version listed at the bottom of the page.
  4. You must launch the downloaded setup file by double-tapping on QuickBooksToolHub.exe).
  5. Furthermore, go through the instructions given on the screen and give consent to the License Agreement.
  6. Once the installation ends, double-tap on the Windows Desktop to launch the Tool Hub on your device.

2. Utilize the QuickBooks File Doctor To Fix the Issues

  1. Once you have successfully downloaded the QuickBooks Tool Hub, open it on your device.
  2. After this, hover your cursor towards the Run QuickBooks File Doctor tab. You must wait until the tool is repairing the issues.
  3. You are supposed to choose the company file by clicking on the drop-down menu. If the file isn’t visible to you, opt for the Browse and Search option to locate your file.
  4. Following this, choose the Check Your File option and then click Continue to proceed.
  5. At last, add the QuickBooks Admin password accurately and hit the Next button.
  6. The scanning process will entirely depend upon your file size, and it might take up to 10-15 minutes to wind up the process. Once the scanning process is over, launch QuickBooks and then your data files.

Download QuickBooks File Doctor from the Official Website

There is yet another way to get the QuickBooks File Doctor download i.e from the Intuit’s official website. For this, you must follow the steps given below attentively.

  1. Primarily, download the QuickBooks File Doctor on your device.
  2. After this, save the file named QBFD.exe to the place where it is easily accessible.
  3. On the downloaded setup file to initiate the installation process.
  4. Go through the instructions displayed on the screen to accomplish the installation process.
  5. After the successful installation, tap on the file to open it.
  6. Now, you can utilize this tool to fix the QuickBooks company file issues.

Step-by-Step Guide to Run QuickBooks File Doctor (Stand-Alone Version)

Here, we have stated the proper instructions to use the stand-alone version of the QBFD tool.

  1. Ensure you have installed the newly launched version of the QuickBooks doctor tool.
  2. You may also get the tool download from Intuit’s official website. If you have installed the QB File Doctor Tool already, hit the Run button to move further.
  3. Now, double-tap on the QuickBooks File Doctor Tool icon. Later on,  continue with the installation process by following the on-screen prompts.
  4. If the tool is still not open on your device, use the Windows Taskbar to open it.
  5. Next, you must select the browse option and search for the damaged company file. Then, you must start the QuickBooks File Diagnostics to resolve the errors.
  6. Consequently, you will obtain two options on the File Doctor window. You are supposed to pick the appropriate option, which is as follows;
    • If you experience the 6000 series of errors or the company file is damaged, you must go with the first option.
    • On the other hand, if you are encountering network issues, it’s best to opt for the second option.
  7. Following this, you must add the correct Company File Admin password within the respected text field and hit the Next button.
  8. Furthermore, pick any one of the following options to continue with the repair process.
    • Workstation Option:- You must go for this option if you want to fix the issues related to the company file.
    • Server Option:-  The users must choose this option when the company file placed on the client system can’t be accessed properly.
  9. After this, tap Yes if you are working on the QuickBooks server/host. Otherwise, hit the No option while working on the QuickBooks workstation.
  10. Eventually, the QuickBooks Doctor Tool will immediately repair the data files.
  11. You are supposed to wait until the tool repairs or fixes the bug. The time taken to repair the error will depend upon the data file size, network speed, and the complexity of the error.
  12. At the end of the process, you must pick the Close File Doctor Tool.

Conclusion

We’ve now reached the end of this guide, and we hope you’re ready to put the QuickBooks File Doctor tool to good use for resolving company file and network issues. If you’re still running into problems or unsure about any step, our QuickBooks Support professionals are just a click away. Use the live chat option to get immediate, personalized help.

QuickBooks Error H202 [Solved] – Switch to Multi-User Mode Easily

Facing issues while trying to switch from QuickBooks single-user mode to multi-user mode? Well, the reason behind this hindrance is QuickBooks error H202. Many users also face this error when QuickBooks is unable to open a company data file saved on another system. By this, an error Window pops up on the user’s screen, indicating the blocked multi-user connection to the server.

At the time of this error, users notice a message on their screen stating, “You are trying to work with a company file that is located on another computer, and this copy of QuickBooks cannot reach the server on that computer. (H202)” and “QuickBooks could not open the file in multi-user mode. (H202).” Multiple factors are responsible for this issue, which we will talk about further in this blog.

Primary Factors Responsible For QuickBooks Error Code H202

Users may encounter the error H202 due to the communication glitch between your QuickBooks Desktop and the server. Along with this, we have jotted down a few more common factors that are responsible for QuickBooks error code H202.

  1. Misconfigured or incorrect QuickBooks hosting settings can cause users to face the error code H202.
  2. Improper DNS configuration settings can also contribute to the occurrence of QuickBooks error message H202.
  3. You may receive the QuickBooks error message H202 due to the damaged or corrupted .ND network file.
  4. The missing IP address of the QuickBooks server and or the Host can also bring the error code H202 to your QuickBooks Desktop.
  5. Issues with your QuickBooks Database Server Manager are another factor responsible for H202 error QuickBooks.
  6. Users with Inactive or disabled QuickBooks services may face issues while switching from single-user mode to the QuickBooks multi-user mode.
  7. If QuickBooks services such as QuickBooksDBXX and QBCFMonitor are facing issues while running in the background, it may lead to the H202 error in QuickBooks.
  8. Any damage or corruption in your QuickBooks company data files (QBW files) can surely cause users to face different types of QuickBooks errors, including error code H202 in QuickBooks.

What Signs Can Help You Identify QuickBooks Error H202?

The following are the clues that will help you prominently identify the QuickBooks error H202. Also, when you know about such signs of error, you can be better prepared in advance to fix the issue.

  1. When your QuickBooks application frequently stops responding or turns black, it’s due to the presence of the error.
  2. As discussed above, the most obvious sign of the error code H202 is when you are unable to switch from the QuickBooks single-user mode to the multi-user mode.
  3. If you notice that your Windows automatically shuts down due to damage to the computer device, it’s also an indication of the QuickBooks H202 error.
  4. The blurred screen is also one of the major signs of QB error H202.
  5. Unresponsiveness of your keyboard tabs and mouse clicks can also alert you about the error presence.

Methods to Perform and Troubleshoot QuickBooks Error Code H202

Carefully read this section to troubleshoot the QuickBooks error code H202. We have listed five easy methods to perform and get rid of this stubborn error that is hampering your productivity.

But, before this, make sure to create a backup of your company data file. During the troubleshooting procedures, your company data becomes vulnerable to loss and failure.

  1. First, move to the File menu and click the Backup data option.
  2. Select the location for your backup data. Either choose a Default location for default data backup or choose an Alternate location for external data backup.
  3. Click the Backup option and end the process by clicking the Finish button.

1 – Verify the QuickBooks Services on your Host Computer

To work on QuickBooks without any interruption, your QuickBooks services must be free of any issues. You can verify this by performing the following steps:

  1. First of all, access your host computer by launching the Run Window. (Press Windows + R keys for this). In the Run Window, type “services.msc,” and enter the OK button.
  2. Now, you will get a Services window on your screen. Here, you are required to locate and select the version of your QuickBooks Desktop with the QuickBooksDBXX option.
  3. After this, ensure that your QuickBooks version’s Startup Type reflects the Automatic tab. Along with this, you need to check Service Status.
  4. Now, if the status is not displayed as Started or Running, you need to click the Start button and continue.
  5. In this step, click the Recovery button and select “Restart the Service” for the categories given below:
    • First Failure
    • Second Failure
    • Subsequent Failure
  6. Continue to save all these changes by first clicking the Apply button, followed by hitting the OK button.
  7. After this, repeat the entire procedure for QBCFMonitorService. Continue to this and access all your QuickBooks workstations to turn ON the multi-user mode.

Read More – How to Fix QuickBooks Error H101?

2 – Repair the Network Problems with your QuickBooks Database Server Manager

This troubleshooting technique will fix the errors related to your QuickBooks multi-user mode. Thus, you can avoid facing H202 error QuickBooks.

  1. Initiate this procedure by first downloading and installing the latest QuickBooks Tool Hub version from the official Intuit website.
  2. In the next step, you need to double-click the downloaded QuickBooks Tool Hub file and begin with its installation.
  3. Now, the tool is ready to open. Open it and hit the Network Issues button, and continue to choose the QuickBooks Database Server Manager.
  4. Here, you will get the Start Scan option. Click this option and browse the company file having issues by clicking the Browse tab.
  5. After this, let the tool scan your file for issues but make sure you don’t close the Window till the scanning is done successfully.
  6. Now, you are required to close and open your QuickBooks application. After this, try to switch to the multi-user mode. If the error is still disturbing, move to the next method.

3 – Create a New QuickBooks Company File Folder

You can easily rectify the QuickBooks error code H202 by moving your QuickBooks company files to the new folder.

  1. To begin with this, you need first to make a new file folder on your server computer and place this folder in a location that is easy to access.
  2. In the next step, provide the required permissions to the new file folder to transfer the QuickBooks files.
  3. Now, press the CTRL + C keys to copy the company files, followed by pressing the CTRL + V keys to paste them into the new file folder.
  4. After this, try to open your QuickBooks company file in multi-user mode.

Still, the error is creating problems while switching to the multi-user mode. Try the next method.

4 – By Adding Server IP Address to your Windows Host File

The missing server on your Windows Host file is also responsible for the QuickBooks H202 error. So, let’s continue fixing this root cause by performing the steps mentioned below:

  1. First, make sure to close all the opened QuickBooks Windows and then navigate to the path C:\ Windows \ System32 \ Drivers \ Etc or C:\ Windows \ Syswow64 \ Drivers \ Etc on the QuickBooks server.
  2. In the next step, double-click the host file after being prompted for a program and open Notepad.
  3. In the Notepad, manually type the IP address along with your Computer’s name for the server. Make sure to use the Tab key on your keyboard rather than using the Spacebar to separate the IP address and the name of your Computer.
  4. After this, try to launch your QuickBooks Desktop in multi-user mode to verify whether the QuickBooks error H202 has been rectified or not.

5 – Use QuickBooks File Doctor Tool to Eliminate Error H202

The effective and free QuickBooks File Doctor Tool is enough to resolve issues with your company files. When these internal issues get resolved, you can avoid facing error H202 in your QuickBooks software.

  1. Initiate fixing the issue with File Doctor Tool by first opening it and choosing the Company File Issues option from the File menu.
  2. Now, click the Company file having issues, and if you can’t find it, click the Browse button to find it.
  3. Choose the file from the list of files and hit the Continue button.
  4. Finally, enter the necessary admin credentials, including Username and password, in the given space.
  5. Hit the Next option, and you’re done with the procedure.

Finishing Thoughts..!

Hopefully, after performing the solutions mentioned above, you have rectified QuickBooks error H202. But, if nothing helps and you are unable to resolve this issue, call our professional QuickBooks team at +1-844-269-7070 or reach out to us via Live Chat Support. Our technicians will help you professionally and assist you with instant resolution strategies. Connect with us, resolve this error successfully, and return to your work with QuickBooks multi-user mode.

Hassle-Free Processes to Fix Error F1040-516 TurboTax Easily

Confronting technical issues is common while filing a tax return using TurboTax. However, finding the right solutions to Fix Error F1040-516 TurboTax might help file taxes smoothly.  This rejection error often occurs when applying for the exemption for which your parent previously claimed you as a dependent. In other instances, it also appears when the IRS rejects your tax return if the taxpayer’s SSN is already added as a dependent on someone else return. This is because the taxpayer’s SSN couldn’t be present on two different tax returns without reflecting that they are claimed as dependent.

If you are also confronting the error message Error Code F1040-516 TurboTax, then you must verify that the taxpayer’s SSN has been mentioned properly. Furthermore, to learn more about the causes and the troubleshooting solutions to fix the rejection error, read this post.

Are you struggling while fixing the Error F1040-516 TurboTax without having any technical experience? Ring us at +1-844-269-7070 and communicate with our TurboTax experts to get the exact solutions according to your query.

What are the Factors Leading to the Reject Code F1040-516 on TurboTax?

If you are encountering Reject Code F1040-516 while e-filing the form, then it might occur due to any one of the following reasons. So, let’s have a quick look at all the root causes which is preventing you from filing the form accurately.

  • If somebody else has filed the tax return using your Social Security Number, then you wouldn’t be entitled to file the form F1040-516 with TurboTax.
  • Another reason could be using the incorrect Social Security Number, which isn’t associated with your registered company name with IRS.
  • Sometimes, the issue may arise if the parent of the taxpayer has already filed the form on some other tax return.

Read More: How Can I Transfer Past Turbo Tax Returns

Simple Methods to Fix Error F1040-516 in TurboTax

In this blog’s section, we have provided you with the different cases that will help you in fixing the reject F1040-516 TurboTax error easily.

Case 1: If the Social Security Number You Mentioned Is Incorrect

Users must verify that they have mentioned their Social Security Number correctly when filing tax returns through TurboTax.

TurboTax Online Users 

  • Begin the process by logging in to the TurboTax Online application and then switch to the Personal Profile screen.
  • When you reach the Personal Profile screen, pick the correct name. Later on, you must match the SSN mentioned with the number listed on your Social Security Card.
  • If you see that the Social Security Number mentioned isn’t correct, then click on the Edit tab and enter the correct one.
  • At last, hit the Continue tab after entering the right social security number.

Users of TurboTax Desktop

  • Login to your TurboTax Desktop account using the correct login details and then choose the Fix My Return option.
  • Afterwards, opt for the Personal Info tab from the QuickBooks Desktop application.
  • Thereon, visit the Personal Info Summary page and then match the Social Security Number with the number mentioned on your Social Security card.
  • If you find that the SSN listed is incorrect, hit the Edit tab, followed by the Continue menu.

TurboTax Mobile App

  • Before moving ahead, log out of the TurboTax application by tapping on the menu icon and then the SignOut option.
  • Afterwards, access the browser and log back into your TurboTax account.
  • Finally, fix and then refile the return in the TurboTax Online application using the instructions explained above.

Case 2: Refiling of the Tax Return After Correcting Social Security Number

  • Initially, you must sign in to your TurboTax account and click the File menu.
  • After that, when you reach the Welcome screen, hit the highlighted Continue tab.
  • Later on, click the Start tab and use the instructions provided on the screen to e-file your tax return.

Case 3: E-filing using the Social Security and the Claimant Details

You must try filing form 1044-516 after removing the exemption so that the e-file server won’t reject your tax return once again. Doing so will not only help you fix the error but also help increase your taxes.

  • Primarily, login to your TurboTax account and browse the File menu.
  • After this, visit the Personal Info screen, wherein hit the Edit menu beside your name.
  • Next, you must scroll down to the bottom of the page to learn about a few things.
  • Thereon, give the answer “Yes” to the “Someone else can claim me as a dependent on their tax return”. Along with this, answer yes to the question, “And this person will claim me on their 2023 tax return.”
  • Later on, hit the Continue tab and move to the File menu once again.
  • Now, when you are on the Welcome Back screen, choose the Continue tab. Herein, you must avoid choosing the Fix My Return tab.
  • At last, tap on the Start tab and then follow the rest of the instructions on the screen to e-fil your return.

Read Also: How can I View My Previous Tax Return in TurboTax

Case 4: Claiming For Your Exemption Once Again

There are certain instances when you notice that the SSN number is not mention properly and you know about the person who claim for exemption. At that time, you have to print and file the return. This is because the e-file server doesn’t let you use the same social security number twice.

  • Login to your TurboTax account and move to the File menu.
  • When you reach the Welcome Back screen, click on the Continue tab.
  • From the upcoming window, hit the Start menu and then tap on the File by Mail option. This will let you print and mail your tax return directly to the IRS.

Later on, till the time the other party imposes their return by removing as a dependent, the IRS will get in touch with both parties to know who wants to claim you. Once they came to know about it, one of the parties had to repay the extra taxes for the duplicate claim.

Case 5: When you suspect the tax-related identity theft

If you are sure that you are a victim of tax-related identity theft, then you must consider the following facts:

  • It is necessary to consider the IRS procedures for reporting the fraudulent return.
  • You can keep track of your monitor returns via TransUnion, Equifax, and Experian for any suspicious activity.
  • Moreover, you may also file a police complaint with your local law enforcement agency.
  • Otherwise, you can file a complaint with the Federal Trade Commission (FTC) at the Identitytheft.govt site.

If you notice that your Social Security Number is compromised and you are well aware of the victim, then make use of these steps:

  • You can respond immediately to any IRS notice by placing a call.
  • It is necessary to fill out IRS Form 14039 and the Identity Theft Affidavit, print it, and then mail or fax it as per the guidelines.
  • At last, continue paying your taxes and file your tax return.

Summary

Now, you can easily resolve the error F1040-516 TurboTax using the solutions explained above in this post. Thus, it will help you e-file the tax return without fearing rejection of the form. Furthermore, if you still have any queries, feel free to connect with our TurboTax experts for help.


TurboTax Deluxe: System Requirements, Features & Download Guide 2025

TurboTax Deluxe is an upgraded version of TurboTax, which comes up with exceptional features and functions to simplify your tax filing process. Moreover, this software is designed to compute over 350 line-item tax credits and deductions. Besides this, this software also lets the taxpayers determine who qualifies as a dependent and helps protect them from tax-saving deductions. However, to get the Turbo Tax Deluxe into use, it is necessary to set it up for the seamless tax filing process.

In this write-up, we have provided complete details of different versions of TurboTax Deluxe along with its benefits of its usage. Let’s start reading this blog.

Looking for a tax expert to use the TurboTax Deluxe for filing the taxes smoothly? Ring us at +1-844-269-7070 and let our experts help you with all the tax-related concerns.

System Requirements For TurboTax Deluxe Setup

Before running the TurboTax Deluxe on your device, it is necessary to ensure that your system meets the basic system requirements. Thus, it will ensure to install the software smoothly so that you can get your taxes done without any interference.

TurboTax Deluxe Online Specifications

Operating System

  • It works well with the Windows 10 and Windows 8.1 operating systems.
  • Also, you can run it on the Mac operating system of versions Mac OS 11.0 (Big Sur), Mac OS X 10.15 x (Catalina) and Mac OS X 10.14 x (Mojave).
  • Moreover, it also works well on the Android phones 7 .x, iOS 12.x as well as on Chromebook.

Supported Web Browsers

  • Chrome 74.x, Firefox 68.x, Opera 64.x, and Edge 17 are suitable for the Windows operating system.
  • The web browsers required for Mac operating systems are: Safari 14.x, Chrome 83.x, Firefox 77.x, Edge and Opera 64.x.
  • For Android mobile devices, the Chromium default browser is perfect. Whereas for iOS, Safari, Chrome and Firefox.

TurboTax Desktop Deluxe

Windows Operating Systems

  • You can run the TurboTax Desktop Deluxe freely on Windows 10 or the upgraded version.
  • Also, it supports the Windows 10 and Windows 11 of the 64-bit operating systems.

RAM

  • The minimum space required for the smooth running of TurboTax Desktop Deluxe is 4 GB.

Hard Disk Space Required

  • The users must require the hard disk space of 1 GB. In addition to this, 4.5GB RAM is necessary for the installation of Microsoft .NET 4.8.

Screen Size

  • Moreover, the screen resolution must be 1024 X 768.

Network Connectivity

1 mbps of the modem is required for the smooth activation and software updates of the TurboTax Deluxe application.

Third-Party Software

Also, check that the third-party software required is Microsoft Visual C++ 2022 Redistributable. Moreover, you must also require Microsoft .NET 4.8 version.

Mac Operating Systems

Operating Systems Supported

  • You must require the following operating systems to run on TurboTax Desktop Deluxe for Mac software.
    • macOS 13 Ventura 13
    • macOS Sonoma 14
    • macOS Sequoia 15

RAM

  • For the smooth running of the TurboTax Desktop Deluxe, the space must be 4 GB for the Mac edition.

Hard Disk Space Required

  • 1 GB of hard disk space is necessary for a better experience of the TurboTax Desktop Deluxe application.

Screen Resolution

  • 1024 X 768 screen size is supported to get the better experience while running TurboTax Deluxe.

Network Connectivity

  • Check that you have 1 Mbps of the modem for the uninterrupted activation, software download and update process.

Read More: Comparison Guide for TurboTax Basic vs Deluxe

Exclusive Features Of Turbo Tax Deluxe Online

The TurboTax Deluxe Online application provides guidance for converting your biggest investment into your biggest tax break. It also provides its users with several other features which makes the tax filing easier.

  • The best thing about the TurboTax Deluxe Online software is that it helps its users to get the refund-boosting education tax credits. Also, it helps you with the tax deductions made for tuitions and expenses done for higher education.
  • Moreover, this tax software assists you in identifying who qualifies as your dependent. After this, TurboTax Deluxe helps you provide assistance with tax-saving deductions and credits.
  • Sometimes, when you purchase a house, have a child or make any other big decision in your life, it will eventually affect your taxes. In those circumstances, TurboTax will guide and ensure that you receive any new tax deductions for which you are qualified.
  • Also, TurboTax Deluxe Online provides you with an ItsDeductible app that helps compute the value of items you donate. Also, this application will help in determining what qualifies under the charitable donation for paying taxes.
  • Additionally, this software also helps you deduct mortgage interest and property taxes. Also, TurboTax Deluxe Online help you in claiming for the expenses associated with the selling your home.

Prominent Features of TurboTax Desktop Deluxe

TurboTax Desktop Deluxe is a perfect solution which helps the taxpayers in processing their tax on time without any further delays. Besides this, there are several other features which you can access with Desktop version of TurboTax Deluxe.

  • TurboTax Desktop Deluxe allows its users to get the claim for important family tax credits. This credit includes Child & Dependent Care Credit, Earned Income Credit and Child Tax Credit.
  • With the help of the Audit Tax meter, it becomes easier to review your return. Moreover, you can also use it for checking the risk level of a tax audit.
  • You can also take a snap or upload the W-2 form photo for accurate importing of data into the forms.
  • Besides this, TurboTax Desktop Deluxe also helps in finding for above 375 tax deductions and credits to obtain the best tax refund.
  • Additionally, it helps students receive tax credits for education.
  • The users can also monitor and value the items that are donated to charity.
  • Above all of this, this software includes state tax preparation for one state, which is valued at around $40.

Discussing About the TurboTax Deluxe Price Strategy

It is essential for the users to know about the TurboTax Deluxe price before purchasing it to make the right decision suitable for their requirements. Below, we have explained the cost of TurboTax Deluxe subscription plans. Let’s have a look.

1. TurboTax Free Edition

  • The TurboTax Deluxe Free Edition might cost up to $0- $99.
  • Under this subscription plan, you can upload or import the documents such as W-2 forms.
  • You can also get assistance through the AI-Powered Intuit Assist.
  • With the help of the CompleteCheck application, you can review your return for accurate tax calculations.

2. TurboTax Live Assisted

  • The cost of TurboTax Deluxe Live Assisted is around $39-$149.
  • While getting this subscription plan, you can enjoy unlimited customer support and guidance for filing taxes.
  • Also, you can connect with the tax professionals at TurboTax during the tax filing.
  • Moreover, you can wind up filing taxes with the expert review at no additional charges.

3. TurboTax Live Full Service

  • The users have to pay around $89 to get the TurboTax Deluxe Live Full Service edition.
  • Moreover, getting this subscription plan helps you find the right match with your local tax expert.
  • You can get a quick overview with your tax expert before making final approval of paying taxes.
  • Also, this plan gives you the authority to connect with the tax professionals remotely at any time to resolve your tax concerns.

Explaining the Comparison of TurboTax Deluxe Vs Premium Versions

TurboTax Deluxe TurboTax Premium
TurboTax Deluxe is used to increase the deductions claim against mortgage interest and charitable contributions. The TurboTax Premium version includes Deluxe as well as Investments and rental properties.
This version of TurboTax is best for people engaged in charities and donations. The Premium Version of TurboTax is used for reporting personal as well as business income and expenses.
Moreover, it is a great software used to claim tax deductions and credit. Also, it is a great software used to report personal and business income as well as expenses.

Explaining the Comparison of TurboTax Deluxe Vs Premier

TurboTax Deluxe TurboTax Premier
TurboTax Deluxe is a great option if you own a home, or having certain medical benefits. TurboTax Premier is perfect for the taxpayers who have investment income besides simple interest and dividend payments.
It is suitable for those who are dealing with medical expenses, homeowners. Also, TurboTax Deluxe is perfect for the people engaged with charitable donations. Moreover, this software is suitable for those with stocks or crypto. Also, if you deal with capital gains and losses from other income who will need to file a Schedule D.
The TurboTax Deluxe edition doesn’t includes Schedule D. Moreover, it also doesn’t reports capital gains and losses. This TurboTax version includes Scheduled D, Form 8949 and used for reporting capital gains and losses.

Read Also: How to Remove TurboTax Deluxe from your Windows or Mac

Understanding the Comparison of TurboTax Deluxe Vs Free

TurboTax Deluxe TurboTax Free Edition
TurboTax Deluxe edition is best for the homeowners, claiming deductions, or for the people indulged in charitable contributions. TurboTax Free edition is the perfect software which covers the following tax situations.

  • Earned income Tax Credit
  • Claiming the standard deduction
  • Limited Interest and dividend income reported on 1099-INT or 1099 forms.
  • Child Tax Credits
  • W-2 income
This tax solution isn’t suitable for reporting capital gains and losses. Moreover, this edition won’t covers the following tax situations.

  • Stock Sales
  • Business or 1099-MISC income
  • Credits, deductions and income reported on scheduled 1-6.
  • Itemized Deductions
  • Rental Property Income

Explaining the Deluxe TurboTax Download and Installation Procedure

Before downloading the new version of the TurboTax Deluxe on your workstation, it is essential to remove the older version. Also, it is recommended to conduct the backup of the company’s financial data. Furthermore, go through the proper procedure described below for the setup of the software.

  • Initially, it is necessary to create an TurboTax account for downloading the application on your device. If you already have then you can use them to initiate the process.
  • After this, purchase the TurboTax Deluxe product, which is suitable for the requirements.
  • Once the product is purchased, you will get the download link in TurboTax’s Purchase Confirmation email.
  • Thereon, you must log in to the email and click on the download link to initiate downloading the TurboTax Deluxe.
  • Afterwards, proceed to the download section of your system. Then, double-tap on the downloaded setup file for TurboTax Deluxe.
  • Furthermore, thoroughly review the License Agreement and give your consent for installing the TurboTax Deluxe product.
  • Later on, choose the install type from the options given. Later on, hit the Install tab to successfully install the TurboTax Deluxe.
  • Finally, complete the setup of the TurboTax Deluxe application. For that, implement the steps instructed on the screen for successful installation.

Crux Of This Blog!!

TurboTax Deluxe is a one-stop solution that helps the tax payers in claiming the tax deductions and get refund for the refund you are eligible. Moreover, this post have guide you enough regarding the features of the different TurboTax versions. If still you require any help, then feel free to connect with our TurboTax experts for quick resolution.