
Being a daily QuickBooks user, you must be encountering technical issues while using the software. Regardless a newbie or a professional user, anyone can face issues with QuickBooks. Fortunately, Intuit has invented an all-in-one platform, which is QuickBooks Tool Hub to help users like you. This QuickBooks Tool Hub download and installation is easy to undertake, and to help you with this, we have come up this blog post.
Here, we will learn everything about the latest QuickBooks Tool Hub 1.6.0.8 version, including its download and installation, remarkable features, different tabs and tools available, and much more. Let’s continue reading this post till the end.
What’s the Latest QuickBooks Tool Hub Download 1.6.0.8 All About?
Undoubtedly, QuickBooks has been recognized as one of the effective and cutting-edge software for the accounting professionals. But, it’s a technology and you never know when an unwanted technical glitch happens and hamper your ongoing workflow and overall productivity. For such instances, the latest QuickBooks Tool Hub download 1.6.0.8 can help you.
This free utility can help users like you fixing the common QuickBooks issues such as installation errors, login issues, company file problems, network and connection glitches, and much more. In addition, the Tool Hub is an exclusive compilation of the trendsetting tools and services, helping the daily users address all the possible software issues.
Before the invention of the Tool Hub 1.6.0.8, the daily users used to download multiple tools for specific QuickBooks errors or technical issues. However, now the availability of the QuickBooks Tool Hub has made everything easy for the users by providing the direct access to all the required tools or services.
System Requirements to Download and Install QuickBooks Tool Hub
Before download and install QuickBooks Tool Hub, ensure the below-given minimum requirements on your computer system. The requirements given below are essential, allowing you to easily perform the Tool Hub download and installation. Have a quick look:
- A reliable and strong internet connection on your computer system. Ensure high-speed internet access with at least a connection speed of 56 Kbps (1 Mbps recommended).
- Microsoft components such as Visual C++ redistributable package and .NET Framework are mandatory for an error-free installation of the Tool Hub on your Windows system.
- You need to ensure that your system has the recommended 8 GB of RAM for a 64-bit system. Also, we suggest you get 16 GB of RAM for extra program files.
- A 2.4 GHz minimum processor is also one of the basic requirements for daily users.
- Your screen display must be optimized for 1280×1024 resolution or higher, ensuring up to two extended monitors.
Download & Installation of the QuickBooks Tool Hub 1.6.0.8 Version
After ensuring the system requirements given above, now let’s begin downloading and installing the QuickBooks Tool Hub 1.6.0.8 version. You must undertake the instructions given below to perform the easy installation.
Step 1 – Download the Setup file of the QuickBooks Tool Hub
- To begin this method, you must make sure that no tabs or windows are running in the background. If so, close them all, and restart your computer system.
- Next, visit the official Intuit website and then move to the QuickBooks product download page.
- Afterward, click the link to download the QuickBooks Tool Hub setup file. Keep waiting till the file successfully gets downloaded, which will take a few minutes.
- Once the file gets downloaded, now save it on your computer’s desktop location, from where you can easily access this downloaded file. This file is QuickBooksToolHub.exe.
- Done till here? Now, close all the tabs, and move to the next step to begin the installation of the QuickBooks Tool Hub 1.6.0.8.
Step 2 – Installing the QuickBooks Tool Hub Latest Version
- To begin installing the Tool Hub, you first need to move to your computer’s desktop location, where you’ve saved the setup QuickBooksToolHub.exe file.
- Once you open this file, you will find some on-screen prompts to perform. Carefully continue to perform these instructions, and then click the Next button.
- By this, you will get a license agreement with all the terms & conditions on your screen. You must carefully read and then agree to these terms & conditions by selecting the respective box. Also, to accept the license agreement, choose the Yes button.
- Now, you will be asked to choose the location within your computer to keep the QuickBooks Tool Hub latest version.
- Afterward, begin the installation of the Tool Hub by choosing the Install button. By this, the installation will begin, which will take a few moments.
- Now, wait accordingly till the installation successfully ends. Once it’s over, you must click the Finish alternative.
- Next, close all the open tabs and running windows on your system, and then restart your computer.
What are the Different Tabs Available within the QuickBooks Tool Hub?
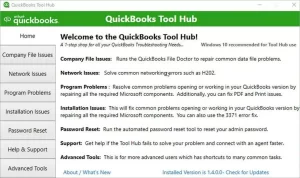
Once you successfully complete the installation of the QuickBooks Tool Hub 2025, open the Tool Hub and start exploring it. You will find the tabs given below:
Home
The first tab is particularly designed to help users get a complete information about all the tools, services, utilities, and features available within the Tool Hub. These brief details and information helps QuickBooks users easily move into the QuickBooks Tool Hub. By this, users also get an idea about when and how to use the different tools.
Tab for Company File Issues
While managing QuickBooks operations, users encounter a number of issues such as the QuickBooks company file errors, including the 6000 series errors. These issues are the result of data damage, corruption, discrepancies, and sometimes the file network issues as well. At such times, users must move to the Company File Issues tab, from where they can access the QuickBooks File Doctor Tool and Quick Fix My File.
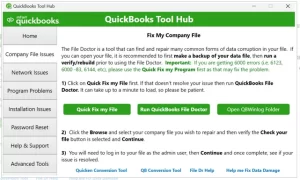
These tools and utilities are easy to use to address all sorts of company or file network issues within the QuickBooks application.
Network Issues Tab
Another tab is for addressing network errors in the system. These issues also commonly occur when there’s a problem with the internet connection or network configuration, preventing the QuickBooks software from connecting with the company file. Thus, to help daily users, the QuickBooks tool hub free download has a dedicated tab, which is the Network Issues tab.
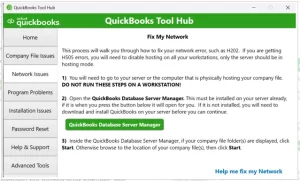
Also, when a user encounters the H-series multi-user errors, this tab and its services, such as the QuickBooks Database Server Manager, can help. By ensuring this active service, users can fix all the network-related or multi-user errors on the QuickBooks software.
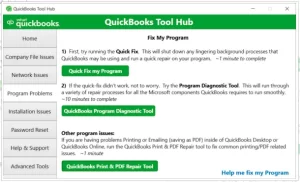
Program Problems
As mentioned above, QuickBooks is a technical program, and anyone using it can encounter errors. Often, the program itself becomes a problem and can bring a number of technical issues. Thus, to help users in such a situation, the QuickBooks Tool Hub 2025 has included the Program Problems tab. Certainly, these issues can occur anytime, but with the help of the tools available within this tab, including Quick Fix My Program, QuickBooks Program Diagnostic Tool, and QuickBooks Print & PDF repair tool, users can address the respective problems.
Installation Issues
The next tab is specifically for the Installation Issues. There are times when a user faces issues while installing, updating, or running the QuickBooks software. Installation issues such as error 1603, error code 80070057, or error 1904 can arrive at users due to corrupt or missing installation files. Update problems can occur due to missing system components, such as the Microsoft .NET framework, or insufficient permissions of the QuickBooks installer file.
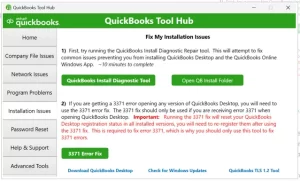
But, whenever a user encounter such update or installation errors, they can easily access the Installation tab of the QuickBooks tool hub 2025. From here, they can utilize the QuickBooks Install Diagnostic Tool available in the tab, helping them effortlessly fix all the respective installation and update errors.
Password Reset
It’s a common tendency among software users to forget their passwords or log in credentials. Certainly, QuickBooks users also often forget their admin or account passwords on QuickBooks, resulting in further login errors. Do you also find yourself in such a situation? If so, just opt for the QuickBooks tool hub download free and install it on your system.
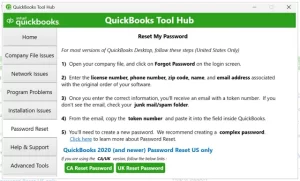
Within the tool hub, you will find the Password Reset tab. Herein, you must consider the given prompts, and continue to address the respective login issues.
Tab for Help & Support
Following the Password Reset tab, the next one is the Help & Support tab. A majority of QuickBooks users prefer asking for professional help and support when it comes to address the QuickBooks software-related errors. This component of the Tool Hub QuickBooks is effective and functional for those who need immediate support from the QuickBooks IT team.
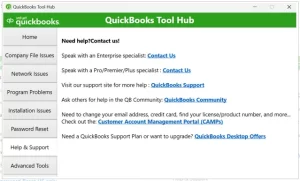
Within this tab, users have choices from browsing the website, messaging us, and a smart-look session, making it easier for them to get customized QuickBooks assistance.
Advanced Tools
This tab of Advanced Tools with the QuickBooks Tool Hub for Windows 11 and 10 is for the users who fail to run the tools and services mentioned above. It’s an excellent resource with a number of advanced tools and services that can help you address QuickBooks crashing errors and company file issues of 6000-series errors. Have a look at the utilities given below that you can access within this tab.
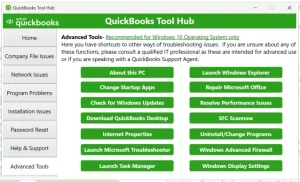
- About this PC – Here, you can get information related to your device, including memory, configurations, documents, and more.
- Windows Update – Access this option if you need to know about the latest system updates.
- Download QuickBooks Desktop – To directly download the QuickBooks Desktop on your computer, you can use this option.
- Internet Properties – To fix the settings related to the Internet Configuration, you must access this option.
- Open Microsoft Troubleshooter—This tool could be effective for enabling rapid error configuration.
- Task Manager – You can access this QuickBooks task manager to learn about the multiple processes or services running for your QuickBooks Desktop software.
- Launch Windows Explorer—Users can also access this Windows Explorer option with the help of the tool hub QuickBooks and continue to perform the respective operations.
- Repair Microsoft Office – There are possible QuickBooks errors caused by the issues related to Microsoft Office. By this, users can easily repair the compatibility problems of the MS Office.
- SFC/Scannow – Sometimes, there are issues related to the system files that might trigger QuickBooks-related errors. To fix such system file glitches, you must access and run this SFC/Scannow feature.
- Windows Advanced Firewall – The misconfiguration of the Windows Firewall settings is one of the significant causes of a number of QuickBooks errors. Thus, by accessing this feature of the QuickBooks Desktop Tool Hub 2025, you can fix such errors.
List of Errors to Fix after QuickBooks Tool Hub 1.6.0.8 Download
Certainly, daily QuickBooks users can encounter a number of errors while using the software. As briefed above, these issues could be related to installation, QuickBooks updates, company files, printing, login, payroll, and many more. For your better insights, we have prepared a table given below:
|
QB Crashing errors |
Company file issues |
QuickBooks Error 80070057 |
Error 1706: No valid source could be found when opening Point of Sale |
|
QuickBooks Error 6190, 816 |
QuickBooks crashing problems |
Error: Unable to start the “IntuitUpdateService” Error: The service did not respond to the start or control request in a timely fashion |
PDF and printing blunders |
|
QuickBooks Error 3371 Status Code 11118 |
QuickBooks Error H202 |
QuickBooks Payroll Error 2002 |
QuickBooks Payroll Error 30159 |
|
Error 1642: Error installing Microsoft .NET. Could not verify the digital signature of file %s. |
Error 1304. Error writing to file Intuit.Spc.Esd.Client.BusinessLogic.dll |
QuickBooks Error 6209, 0 |
H series errors, including QuickBooks error H202, H303, and H505, and H101. |
|
Microsoft .NET Framework Errors |
QuickBooks Error Code 6150 |
QuickBooks Error 6189, 816 |
PDF and printing blunders |
Remarkable Benefits of QuickBooks Tool Hub Download 2025
As briefed above, the excellent QuickBooks Tool Hub helps daily users address and fix general software errors through its impressive tools and features. Now, let’s have a look at the below-given benefits to understand why it’s good to go for QuickBooks tool hub download 2025 and installation:
Easy to Access & Use
Undoubtedly yes! QuickBooks users can easily download and install the Tool Hub. Once it’s downloaded, users can also easily access it, and use the given tools plus services to address the respective QuickBooks issues.
It’s a Free QuickBooks Utility
The QuickBooks Tool Hub is a free utility available on the official Intuit website. Users can download and use it at any time. Along with the subscription to the QuickBooks Desktop software, users can access the Tool Hub with no extra costs.
Fix a Variety of Errors
QuickBooks users can encounter various technical errors while using the software. However, if you have downloaded and installed the QuickBooks Desktop tool hub, it can help you fix various errors. Within this Tool Hub, users can access multiple tools and services to troubleshoot the errors accordingly.
How to Download and Use the QuickBooks File Doctor Tool?
As discussed above, the QuickBooks File Doctor tool easily helps users fix the general company file and network issues in QuickBooks. Now, let’s learn how to access and run this tool. Simply use the prompts given below:
- The very first step is to perform the download and installation procedure of QuickBooks Tool Hub 2025 on your computer, about which we have provided the steps above.
- Next, after installing the Tool Hub, you must restart your Windows system and continue to double-click the icon of the Tool Hub.
- Once it opens, directly move to the left-side panel and click the Company file issues tab. Within this tab, you will find the QuickBooks File Doctor Tool.
- Now, double-click the tool to run it, and provide the admin credentials to run the tool. Following this, you will be asked to upload the company file having data or network issues.
- By this, the tool will begin scanning and repairing the company file errors or network issues. Once done, now click the Finish option, and it’s done.
- Finally, restart your computer and continue performing your respective QuickBooks company file operations.
Where to Find QuickBooks Install Diagnostic Tool & How to Run it?
Sometimes, the installation or update of the QuickBooks Desktop software becomes a challenge, and the reason is issues like QuickBooks error 1327, error 1712 QuickBooks, and many more. At such times, the QuickBooks Tool Hub download again plays a vital role. The available QuickBooks Install Diagnostic Tool can effectively help users:
- Make sure your internet connection is steady and running at a good speed. Also, ensure that no other Windows application or related process is open in the background.
- Once you confirm all these aspects, refresh your desktop and double-click the Tool Hub icon.
- Afterward, move to the given drop-down menu in the left-side of the Tool Hub, and then choose the Installation Issues tab.
- Now, within this tab, you can easily access the QuickBooks Install Diagnostic Tool. Click this tool to run, and it will start running automatically.
- The tool will take around 20 minutes to fix the QuickBooks installation issues. Sometimes, it may take longer than 20 minutes, which is based on your system’s performance and the internet speed.
- Lastly, once the complete process ends, choose the Finish tab, and close all the open windows. Following this, restart your system, and begin with your respective QuickBooks installation or update process.
How to Fix the Blocked QuickBooksToolHub.exe Download File?
Certainly, this type of issue might arrive to the users. Users may receive an error message on their computer screens, indicating that the QuickBooksToolHub.exe has been blocked. The reason behind this issue is the Windows Firewall settings, which blocks QuickBooks-related services to protect your system from any possible harm.
Well, in such cases, users like you must immediately use the prompts below:
- When you receive the notification that QuickBooksToolHub.exe has been blocked, you may also get a message reading, “Microsoft Defender SmartScreen prevented an unrecognized app from starting. Running this app might put your PC at risk. More info”
- So, you just need to click the “More info” tab. Following this, hit the run away alternative to easily install the Tool Hub QuickBooks program.
- Now, this download procedure will take a while. Once the download completes, perform the installation method with the help of the prompts given above.
The Bottom Line!
So, that’s the QuickBooks Tool Hub download in a nutshell. No matter how excellent the QuickBooks program is, technical errors and glitches can happen anytime. Users might find themselves in a panic situation at such times. Fortunately, the easy download and installation of the Tool Hub can save users from such terrific situations. If you’re also looking forward to downloading the Tool Hub, we suggest you use the above method. Carefully install this latest 1.6.0.8 version of the QB Tool Hub, and for professional help, connect with our team at +1-844-269-7070.

![QuickBooks Error H202 [Solved] – Switch to Multi-User Mode Easily](https://www.gotaxation.com/wp-content/uploads/2022/11/fix-quickbooks-error-h202-672x350.webp)