How to Resolve QuickBooks Script Error: A Comprehensive Guide

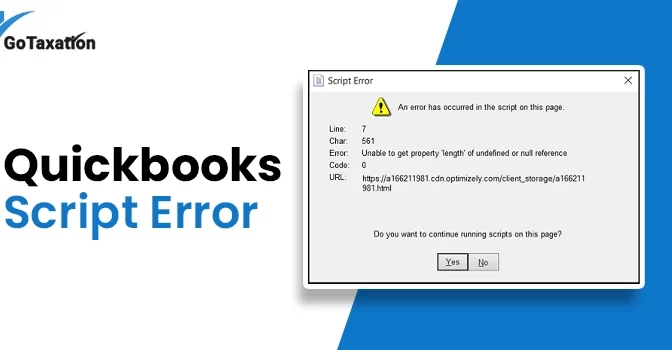
The QuickBooks Script Error usually triggers when the software internal browser engine fails to load a web page. This often appears as a pop-up message stating, “An error has occurred in the script on this page.” To fix the problem, you can add Intuit as a Trusted Site or clear your browser history.

This guide provides step-by-step methods to fix browser settings and restore full functionality to your QuickBooks Desktop. For additional help, you can connect with our certified experts. 

What Causes the Script Error in QuickBooks?

If you are facing a Script Error when I Open function or transaction in QuickBooks. These errors typically occur during online functions like payroll, banking, or software updates. To address this issue permanently, you must identify the root causes of the problem first.

Have a look at the common reasons behind a QuickBooks script error code 0, including:

  1. System Glitches: Your workstation may be facing a virus attack or a malware conflict that interferes with QuickBooks operations.
  2. Configuration Conflicts: This can be caused by unnecessary changes to scripts, disabled script processing, or a Windows Firewall blocking the software’s connection.
  3. Data Corruption: Specific QuickBooks files or internal data components are damaged or corrupted.
  4. Browser & OS Issues: If your browser is full of cache, has a damaged “Script Debugging” feature, or corrupted Windows system files.

7 Methods to Fix the Script Error in QuickBooks

Now, you have understood the possible causes of script error in QuickBooks Desktop. Now, start troubleshooting the error to resume your business operations. Look at the simple solutions given below that help you fix the error:

Method 1. Add Intuit as a Trusted Site

QuickBooks uses Windows Internet settings for web features. Adding Intuit to your trusted sites can resolve the conflict.

  1. Open the Windows Start menu, search for Internet Options, and press Enter.
  2. Go to the Security tab, click Trusted Sites, then click Sites.
  3. Click on the Sites button and add intuit.com and quickbooks.com as a trusted website.
  4. Uncheck “Require server verification” and ensure “Enable Protected Mode” is unchecked. Click OK.
  5. Try to run the application. If you still see the same error, then move to the next step.

Method 2. Delete Internet Explorer Cache

QuickBooks uses the Internet Explorer engine to load data, but corrupted temporary files often cause a QuickBooks desktop script error.

  1. Open Internet Options from the Start menu.
  2. Under the General tab, find the Browsing history section and click Delete.
  3. Check Temporary Internet files, Cookies, and History, then click Delete.
  4. You can also press CTRL + Shift + Delete while in an Internet Explorer window to open the same menu.
  5. Close all programs, open QuickBooks, and check if the Script error is resolved.

Method 3. Set Internet Explorer as the Default Web Browser

QuickBooks relies on the Internet Explorer engine to function. Ensure it is configured correctly.

  1. In Internet Options, go to the Programs tab.
  2. Click the link to “Make Internet Explorer the default browser.”
  3. Click Apply and then OK to save your settings.
  4. Now, open the QuickBooks software. If the script error still appears, move to the next solution.

Method 4. Disable the Script Debugging

This is the most effective method; it stops the error from triggering every time you open a new window.

  1. Go to the Advanced tab in Internet Options.
  2. Scroll down the list until you find the Browsing section.
  3. Under the Browsing section, check “Disable script debugging (Internet Explorer)” and “Disable script debugging (Other).”
  4. Uncheck “Display a notification about every script error.” Click OK.
  5. Once done, restart your computer to see the changes that will resolve the QuickBooks script error line 0.

Method 5. Turn Off Internet Explorer Add-ons

Sometimes, third-party browser extensions or toolbars also conflict with QuickBooks and cause scripts to crash.

  1. In Internet Options, go to the Programs tab and click Manage add-ons.
  2. Select non-essential add-ons and click Disable.
  3. Click Close, then click OK to exit the Internet Options menu.
  4. Reopen QuickBooks and perform the task to see if the script error in QuickBooks is resolved.

Method 6. Clear the SSL Certificate State

Clearing this state can instantly resolve security-related script errors. Here’s how to perform:

  1. Open Internet Options and navigate to the Content tab located at the top of the window.
  2. Look for the Certificates section and click the Clear SSL State button.
  3. A small notification will appear saying, “The SSL cache was successfully cleared,” and click OK.
  4. Click OK at the bottom of the Internet Options window to close it.
  5. To check if the QB Script Error Code 0 is fixed, open the QBDT and try the task again.

Method 7. Turn Off Script Error Notifications

By turning off the script error notifications, you can prevent workflow interruptions.

  1. Open the Internet Options and click on the Advanced tab at the top right of the window.
  2. Scroll down to the Browsing section and find the option labelled “Display a notification about every script error.”
  3. Uncheck the box to stop the pop-ups from appearing.
  4. To save the new changes, click on Apply and then OK to confirm the new settings.
  5. Relaunch QuickBooks to check if the script error in QB is resolved.

In conclusion!

Hopefully, now you are able to address the QuickBooks Script Error by implementing the above effective methods. You can save your valuable time by applying the correct troubleshooting steps and ensuring the best QuickBooks experience. If you still need further help, contact our experts to help you out with this problem.

Frequently Asked Questions (FAQs)

What is a QB script error?

This is a browser-related issue that occurs when QuickBooks Desktop fails to load a web page properly.

How do I fix the Script Error in QuickBooks Desktop?

To fix a script error in QuickBooks Desktop, you can add Intuit as a trusted website in Windows Internet Options, clear the SSL state, and disable script debugging.

What to do if the QB script error is not fixed?

At such times, you can connect with our expert team for getting instant attention to the problem.

What causes the QuickBooks script error?

A QuickBooks script error is primarily caused by issues with Internet Explorer settings.

Do I have to stop my work when a script error message pops up?

No, you don’t need to stop your work entirely when a script error message pops up. By applying the troubleshooting methods, you can resume your work.

How to Make a Journal Entry in QuickBooks: Tips & Tricks

A journal entry in QuickBooks Online is an advanced accounting tool used for recording the financial transactions when standard forms like invoices, bills, or checks do not apply. While mostly tasks are automated in QuickBooks, but knowing how to make a journal entry in QuickBooks is essential for adjustments and specialized accounting needs.

This guide explains how to create, view, and manage general journal entries in QuickBooks to keep your financial records accurate.

What is a Journal Entry in QuickBooks?

A journal entry in QuickBooks Online is a manual accounting record used to move money between accounts or adjust balances. It follows the double-entry bookkeeping system, meaning every transaction must have a balanced debit and credit.

Here’s why we use the QuickBooks online journal entry:

  1. Categorization Errors: To reclassify an expense mistakenly placed in the wrong account.
  2. Non-Form Transactions: For items like depreciation or loan interest that don’t involve a standard bill.
  3. Year-End Adjustments: To ensure tax totals and profit reports are accurate.
  4. Manual Adjustments: To record bounced checks or other corrections that lack a dedicated button in the interface.

After learning about the QuickBooks journal entry, users often ask, “How do you make a journal entry in QuickBooks?” Look at the guide below to create a new entry.

How to Make a Journal Entry in QuickBooks Online?

Before starting, ensure you have the correct debit and credit details. If you are unsure, consult your accountant to maintain ledger accuracy.

Steps to Create a Journal Entry in QuickBooks Online

Follow these quick steps to create a new general journal entry QuickBooks:

  1. Click the + New button on the left-hand menu and choose Journal entry.
  2. On the first line, choose an account and enter the amount as either a Debit or a credit.
  3. On the second line, select the other account you’re moving money to or from.
  4. QuickBooks usually fills in the matching amount for you. Just make sure your total Debits and Credits match exactly.
  5. The QuickBooks online journal entry system may enter the same amount in the opposite column on the other line.
  6. You can add more lines if you want to, make sure your total Debits and Credits match.
  7. Write a short note in the Memo section to remember why you made this entry later.
  8. Click Save and close or Save and new.

Once the journal entry is saved, the transaction updates your account balances immediately. You can find it later in your Account History or by running a Journal Report to see all your manual entries in one place.

How to View General Journal Entry in QuickBooks?

Now, you have understood how to make a journal entry in QuickBooks Desktop. Let’s learn how to view the journal entries:

  1. Go to Reports from the left menu.
  2. Search for “Journal” and select the report.
  3. Select your Report Period (Custom dates) and click Run Report.

How to Delete a Journal Entry in QuickBooks Online?

You should only use the QuickBooks journal entry as a last resort or with your accountant’s help. If you make an error, you can reverse the entry to fix the balance. If it was created by mistake, you can simply delete it. Here’s how:

Learn how to reverse a journal entry

Follow these steps to reverse a journal entry when you need to fix a mistake or balance your accounts. This method swaps your debits and credits but keeps the original transaction in your history.

  1. Go to Settings and select Chart of Accounts.
  2. Afterward, find the account used in the entry and select Account history.
  3. Find the specific journal entry in the account register. You will see the Journal listed in the Type column.
  4. Next, you need to click on the entry to expand it, then select Edit.
  5. On the journal entry screen, select Reverse from the bottom menu.
  6. Once done, click Save and close.

When you click on the Reverse a journal entry option, QuickBooks automatically generates a new entry to balance the first one. This will keep a record of what you have made in the current entry:

  1. QuickBooks keeps the original number but adds an ‘R’ to indicate it is a reversed entry.
  2. To keep your records organized, the new entry is dated for the start of the next month.
  3. The new QuickBooks journal entry keeps the same info, such as the Account, Name, and Description, as the original journal entry.

Follow the Steps to Delete a Journal Entry

If you have created a QuickBooks journal entry by mistake, perform the steps below to permanently delete it. Before you proceed, make sure you really want to remove it, as this action instantly unbalances your accounts:

  1. Go to the Settings and click on the Chart of Accounts.
  2. Find the specific account and select Account history.
  3. Now, look for the journal entry in the Type or Ref No. column to find your entry.
  4. Click the entry option to open the details.
  5. Click on the Delete option and choose Yes to confirm the changes.

Conclusion!


Hopefully, now you have understood how to make a journal entry in QuickBooks easily. By following the above simple guide, you can ensure that your business’s financial records are accurate and updated. If you still face issues in creating, editing, or deleting the journal entry, you can contact our professionals for quick help.

Frequently Asked Questions (FAQs)

  1. What are the three basic rules of accounting for journal entries?

Debit means receiver and credit the giver, debit what comes in/credit what goes out, and debit expenses/credit income.

  1. Why should I use a journal entry instead of a standard form?

Use journal entries for difficult financial adjustments that do not involve standard sales or expense forms, such as when you need to record a specific payroll journal entry example QuickBooks.

  1. What are the types of accounts in QuickBooks?

There are mainly three types of accounts Personal (people/businesses), Real (assets), or Nominal (income/expenses).

  1. How do I create a journal entry in QuickBooks Online?

Click the + New button, select Journal Entry, enter your debits and credits to ensure the transaction balances, and click Save and Close.

  1. Can I edit a journal entry after it has been saved?

Yes, you can edit or delete it via Account History. However, if the entry was already reconciled, avoid editing it to prevent unbalancing your books, create a new adjusting entry instead.

Learn How to Resolve QuickBooks Error H505 (Multi-User)

If you are seeing QuickBooks Error H505, you are not alone. This error occurs when something blocks the multi-user connection with the server. Basically, it means your workstations can not connect to the company file stored on your host computer. Follow this blog post to troubleshoot these connectivity issues and restore seamless multi-user access for your team. 

To fix QuickBooks Error H505, ensure your server services are running properly and that the firewall ports for QuickBooks are configured properly. Still, for professional help, you can contact us.

What are the Causes that trigger QuickBooks Error H505?

The QB error h505 is a network connectivity issue occurring in multi-user mode when workstations cannot connect to the server hosting the company file. It is primarily triggered by incorrect hosting configurations, blocked firewall ports, damaged .ND files or faulty network settings that prevent communication between computers.

Here are the core reasons behind this error message:

  1. Incorrect Hosting Configuration: The most common cause is when a workstation is set to Host Multi-User Access instead of just the server; as a result, you got this error.
  2. Firewall Restrictions: Sometimes the Windows Firewall or third-party security software blocks the necessary ports that QuickBooks uses for multi-user communication.
  3. Damaged or Missing .ND Files: You may also get this error when the Network Data file is damaged or corrupted, which prevents QuickBooks from accessing the company file.
  4. Database Server Manager Issues: When the QuickBooks Database Server Manager is not running properly, it is often an outdated version, or it is failing to scan the company file folder.
  5. Incorrect DNS or Network Setup: The misconfigured network settings also trigger the h505 error in QuickBooks.

How to Identify the Symptoms of QuickBooks Error Code H505?

When the error code H505 in QuickBooks Desktop occurs, you will notice slow software performance, specific error messages, and be unable to use Multi-User Mode.

Here are the key symptoms of QuickBooks error H505:

  1. A message will pop up on your screen stating, “Error Code H505: QuickBooks has encountered a problem and needs to close,” or “This company file is on another computer, and QuickBooks needs some help connecting”.
  2. When it triggers, you are unable to switch from single-user to multi-user mode, or workstations cannot open a company file stored on the host server.
  3. The computer unexpectedly freezes for several seconds or becomes completely unresponsive to keyboard and mouse input.
  4. The active program window crashes repeatedly, especially when you attempt to access shared network data.
  5. Windows may run slowly or lag significantly while QuickBooks is trying to establish a network connection.

Now, you have understood the root causes and symptoms of the QB error code h505. Let’s quickly move to the solutions to fix this error efficiently.

Easy Solutions for QuickBooks Multi-User Error H505

Below, we explore several proven methods to quickly resolve QuickBooks Error H505. For the best results, carefully follow these step-by-step instructions:

Solution 1. Run QuickBooks Tool Hub

The Tool Hub is specifically created to resolve general QB issues, such as error H505. So download the QuickBooks tool hub to run the database server manager and use QuickBooks file doctor to fix the network data (.ND) files that link your workstations to the server. If you still face the same error, move to the next solution.

Solution 2. Configure Windows Firewall Settings

If your system firewall is blocking the connection to QuickBooks, follow these steps to allow QuickBooks full access:

  1. First, press the Windows + R button, type Control Panel, and click Enter.
  2. Next, search for the Windows Firewall and select Allow an app through Windows Firewall.
  3. Click Change Settings; you may need admin permission.
  4. Find the QuickBooks in the list and ensure the checkbox under the Public column is selected.
  5. If QuickBooks is not listed, click Allow another app, browse to your QuickBooks folder, and select the application file.
  6. Once added, ensure the Public option is checked and click OK.
  7. Restart QuickBooks on your workstation to see if the error message H505 in QuickBooks is resolved.
  8. If it still persists, move to the next solution.

Solution 3. Check Network Connectivity Between Workstations & Server

To resolve the QB error h505, it is essential to confirm the connectivity between the workstations and the server. Follow these steps to test your connection:

  1. Search for the Control Panel in the search bar and open it, then choose Network and Sharing Center, and click on “Change advanced sharing settings.” Now you have to turn on the network discovery option and the file and printer sharing option.
  2. On your server computer, press Windows + R, type CMD, and click Enter. In the black window, type ipconfig /all and press Enter. Find and write down your host name.
  3. Go to a workstation showing Error H505. Open the Command Prompt and type ping [Your Server Name] and press Enter.
  4. Afterward, if the reply shows 0% packet loss, your connection is stable. If you see “Request timed out” or packet loss, that means your network settings are blocking the communication.
  5. Now, perform this step on every workstation experiencing the error to ensure the entire network is synced properly.
  6. Once done, try to check if the error code h505 in QuickBooks is fixed or not; if not, then move to the next solution.

Solution 4. Configure Hosting Settings Correctly

This is also a main reason to trigger the QB H505 issues, which are incorrect hosting settings. Follow these steps to ensure only your server is hosting the company file:

  1. Start by opening QuickBooks on each workstation, then go to the File menu, select Utilities, and look for the Stop Hosting Multi-User Access option.
  2. If you see this option, click it to disable hosting on that computer.
  3. In the next step, navigate to the server computer where your company file is stored.
  4. Now, open QuickBooks, and go to the File tab to choose Utilities, and ensure Host Multi-User Access is selected.
  5. After that, restart both the server and the workstations to apply these network changes.
  6. Once done, try to open the company file in multi-user mode on your workstations to confirm the H505 error in QuickBooks is resolved. If not, move to the next step.

Solution 5. Create & Share a New Company File Folder


Sometimes, damaged folder permissions or an old network path can trigger the H505 error in QB. But, by moving your file to a fresh, correctly shared folder, you can repair the connection:

  1. On your server computer, go to your current company file location. Copy the company file and paste it into a newly created folder on your desktop.
  2. Next, right-click the new folder, select Properties, and go to the Sharing tab. Click Advanced Sharing.
  3. Check the box for Share this folder, then click the Permissions button.
  4. Here, choose the Everyone group and check the box for Full Control. Click Apply and then OK.
  5. Click Apply and OK again to close the properties window.
  6. Open the company file from this new location on your workstations to see if the H505 error is cleared.

In a Nutshell!

We hope that now you are able to rectify the QuickBooks h505 error easily by following the above-mentioned methods. After implementing these solutions, you can access your company files in multi-user mode. However, if it fails, you can connect with our certified experts for professional help.

Frequently Asked Questions (FAQs) 

What is QuickBooks Desktop Error H505?

The QBDT Error Code H505 is a multi-user mode issue that occurs when a user attempts to open a company file located on a server but cannot connect to it.

How do I fix a QuickBooks error h505?

By verifying the hosting settings and running a QuickBooks database server manager, you can easily resolve this issue.

What causes the QB error H505?

You may encounter this error code due to improper hosting configuration, firewall restrictions, and corruption .ND files.

How do I turn off hosting on my workstation?

Open QuickBooks on the workstation, go to the File menu and choose the Utilities tab. If you see Stop Hosting Multi-User Access, select it.

What should I do if the problem persists?

After doing all that, if you still face the same issue, you can contact our experts for immediate attention to the problem you are struggling with.